Wednesday, October 31, 2012

Happy Halloween!

Happy Halloween!!!
...to all the ghouls and goblins in blogger land!

I don't do much of the "scary" halloween, I'm more of a "cutesy" halloween creator.  
These cards below show more of my style: 

Yes...I'm still using the Perfect Fit - Frames stamp set (I just can't get enough of it...definitely getting my money's worth!)  The B&T paper (patterned) comes from the Spellbound kit.  The Slate cardstock on the front of the card, was scored, then sanded, highlighting the white core of our papers (I love that about our papers!).  I also wrapped the Black Tulle Ribbon around the B&T paper on the front of the cards, tied into a knot.  The scallop circle and the matted circle were POPPED using 3-D foam tape to give some additional dimension to the cards:
 The other stamp set I used was Perfect Fit- Halloween for the sentiments, and pumpkin.
 

Have a fun and safe Halloween night!  

Monday, October 29, 2012

BOO Banner

Halloween is just about here...so I thought I would show off my "BOO" banner that I have hanging above my fireplace in my studio, before I pack it away until next year. 

I absolutely fell in love with the Spellbound Cricut kit.  The WOTG kit creates a Halloween party for 8 including treat bags, cupcake picks and liners, soda wraps and this banner.  


If you're one to throw a Halloween party, you just might want to consider this kit for next year, 
but purchase it now...as it won't be carried over to the next catalog. 
You'll be sure to impress your guests!!

The papers are so much fun, and only available in this kit...perfect for Halloween!  
I'll show you some more artwork Wednesday.

Sunday, October 28, 2012

Studio J = Tricks and Treats

Time is running out, if you haven't taken advantage of the Studio J special in October!  

Check out the "Monthly Specials" tab in the menu bar above to get all the details on how you can get a free Studio J layout with your Studio J purchase.

Watch this "Love Your Layout" video, and learn some new tricks in Studio J as you treat yourself to the ultimate online creative experience.  
You'll learn how to apply photo filters, create ruffled ribbons and more!


Now, log onto Studio J, and create your own layout! 
Warning: Studio J is highly addictive, SO much fun, and without all the mess or supplies needed to create beautiful layouts.  It's all online!  Try it...I think you'll love it as much as I do!

And don't miss out on your opportunity to save $$$ in October (special ends October 31, 2012) with your Studio J purchase!


Saturday, October 27, 2012

YouTube Saturday Video - Cardmaking WOTG kits

Card Makers REJOICE!  Workshop-on-the-Go kits made just for you!

Grab your Saturday morning beverage of choice, and enjoy this video, as Kristine showcases these TWO fabulous card kits, Avonlea and Pear & Partridge.


FYI - I will be hosting the Avonlea Cardmaking workshop in January 2013...watch for dates!

Friday, October 26, 2012

Christmas Cards - Pear & Partridge Cardmaking WOTG

The weather has suddenly turned cold and it's snowing in Colorado...so it's a perfect time to start thinking about those hand-made holiday cards.  Do you send out hand-made cards for the holidays?  
If so, I've got you covered...Close To My Heart has a workshop kit 
designed especially for Christmas cards!  

I hosted this workshop several times in October...but if you missed it, you can create 15 cards (5 each of 3 designs) on your own...just order the Pear & Partridge WOTG for Cardmaking kit.  Each workshop kit comes with an exclusive stamp set, ribbon, red sparkly glitter gems, cardstock and patterned papers, card bases with envelopes, and an instructional brochure, complete with cutting diagram and step-by-step directions to putting your cards together.  

(click on image to enlarge)

If you send out more than 15 Christmas cards, don't worry...contact me, and I can hook you up with additional supplies to complete more cards, without purchasing another entire kit.  
Many of my guests who attended this workshop did just that!
HURRY...this card-making workshop kit will retire after this holiday season 
and will not carry over to the next catalog.  

Saturday, October 13, 2012

YouTube Saturday! - Dauber Dynamite

In this video,  Kristine and Monica will show you how to get perfect precision from your inks featuring a stamping technique using sponge daubers for a soft, shaded look.
Catch the RAINBOW with sponge daubers!

Enjoy!


Thursday, October 11, 2012

Monogram & Perfect Fit = Tutorial

I've seen so many ideas floating around on social media using the Perfect Fit - Frames stamp set...it's one of my VERY used stamp sets of late.  I love this stamp set...it's just so versatile!

One day, I found this 3x3 card & tote idea on Pinterest (anyone else addicted?), and unfortunately I didn't pin it (what was I thinking???, obviously I studied it enough to re-create it)...and now I can't find the original pin to give credit.  I thought this project would be a good one to do a picture tutorial for...here's the finished project:


 STEP 1: Take a piece of cardstock, 8" x 7-1/4", on the 8"side, score at 2" and 4".  On the 7-1/4" side, score at 2", then flip the cardstock over and score at 2" again.  It should look like this:


STEP 2: Next, measure down 2"and mark the left and right edge of the cardstock.  Make a diagonal cut from your mark to the score line as shown below:


 STEP 3: Cut the middle section to the first score line on both sides as shown:


STEP 4: Adhere piece of patterned paper measuring 1-3/4" by 3"to the lower middle section, centered between the score lines, leaving a border, as shown:


STEP 5:  Cut 2 pieces of patterned pieces measuring 1-3/4" x 3-3/4".  Next, measure down 1-3/4" and mark the left side of one piece, and the right side of the second piece.  Again, make a diagonal cut from your pencil mark to the opposite corner, as shown on each piece.  These will be the sides of your box.


STEP 6: Adhere the two side pieces, centered between the score lines, leaving a border as shown:


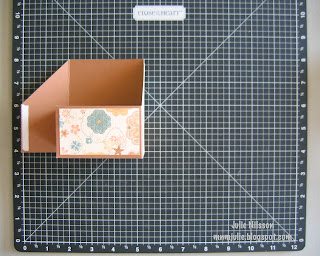
STEP 7:  Next, flip your project over, and add a strong adhesive (I used a sticky strip) to the areas shown:


STEP 8:  Carefully, bring up the center pieces on each side, and wrap the bottom pieces around to create a portion of the box as shown:


STEP 9:  Next, bring the sides of the box to meet the bottom portion of the box, adhering the sticky strip as shown:


 STEP 10:  The box is almost finished!  Make sure all your adhesive is stuck well...I usually take my bone folder and press firmly where I have placed my adhesive.


 STEP 11:  Next, I measured about 3/8"-1/2" from top of box, and centered from left to right, using an oval punch, I created a "handle" for the box:


STEP 12:  Create 3x3 cards to fit inside your box.  Any design will work!  My cards use the Clementine papers, and I used the Perfect Fit - Frames and the personalized Monogram stamps, each letter of the alphabet is sold separately...just $2.95 per letter.  Did I mention that all 4 images on the Perfect Fit - Frames stamp set coordinates with the Art Philosophy Cricut Cartridge?  They do!  How's that for fast, simple and easy!  Just cut the shape on the Cricut, and stamp!

Shhh...I'm giving these to some good friends this weekend as little goodies at our scrapbook retreat!  I sure hope they like them.

I hope I have inspired you to create a project like this...and if you do, please leave a link so I can see what you made.  If you have any questions, please post a comment below, and I will do my best to clarify.  If you enjoyed this picture tutorial, and would like to see more of these, please leave a comment.  I would love any feedback.  Thanks!


Wednesday, October 10, 2012

October Workshop - "Moonlight"

With Halloween right around the corner, I planned to help my gals get a head start on the photos they'll be taking of their little trick-or-treaters.  Earlier this month, I hosted the Moonlight Workshop-on-the-Go kit.  We made these two 2-page layouts:

(click on images to enlarge to show greater detail)
Each Workshop-on-the-Go kit comes with a full color instructional brochure, so it's easy to create the workshop on your own.

I love the colors in the Moonlight paper pack...fall colors have always been my favorite.  But I wanted to share with you to "think outside the box".  These papers are more than just for fall or Halloween.  One of my team members (Hi Bertha!) created a beautiful CHRISTMAS card using these papers...that's right, Christmas!
Bertha's card uses the October Stamp of the Month, Very Merry Christmas.  She dyed the Color-Ready Seam Binding Ribbon with Smokey Plum ink, and added a Rhinestone Designer Brad and the Silver Shimmer Trim for additional bling.  The pattern on the Slate cardstock was created using an image from a Halloween stamp set, All Hallows Eve.  Bertha used the Metallic Markers (silver) in the center of each of the stamped images.  Great job on this card Bertha!  I've had so many compliments, giving you full credit, of course!


Saturday, October 6, 2012

YouTube Saturday - Terrific Two-Tone

Today's video has Monica showing how you can use ANY stamp set to get a two-tone effect when you stamp.  Many of our stamp sets are designed to be "base" and "shade" stamping...but listen carefully as they share the "secret" to how any stamp set can be used for two-tone stamping!   Comment below when you hear it...but don't give the secret away!  "Terrific Two-Tone" features base and shade stamping for a terrific two-tone look.

ENJOY!


Thursday, October 4, 2012

October Stamp of the Month ARTWORK

OCTOBER Stamp of the Month = Very Merry Christmas  


There are 11 images in the Very Merry Christmas stamp set and perfect for your holiday cards...and did I mention 5 images coordinate with the CTMH Artiste Cricut cartridge...no hand cutting!

I was assigned the Dakota paper pack, and created this Country Christmas card.  My card uses the Bakers Twine - Natural Assortment, Round Durable Studs (love these!), and a rhinestone from the Haunted Assortment (how's that for thinking outside the box LOL).  I used 3-D foam tape to "pop" each element on the ornament to give dimension to my card.  Of course, everything is sponged (ink distressed) in Slate ink.


Here is a sampling of what our group created using this stamp set...and to show the versatility of our papers, each person was assigned one of the different paper packs in the Autumn/Winter Idea Book.  Hope these will inspire you to get an early jump on your holiday cards!

 (click on photos to enlarge them for more detail)
Get the stamp of the month for only $5 when you place a $50 order during the month of October.  If you're ready to start your holiday cards...contact me today!