It's not everyday that you open your mailbox and find a hand-stamped card from a friend (Thanks, Shari!). It's one way to surely brighten someone's day!
The stamp set used is Fall Favorites (S1209), which was September's Stamp of the Month, and currently not available...but I bet it will be featured again soon in a near future catalog. So if you didn't get it in September, it might just come around again! The paper, Florentine, is still available and I find it's perfect for autumn cards.
I know so many of us tend to hoard our papers (myself included), and you may or may not realize that papers really do get dated over time. In the years I've been with CTMH, we've gone from one sided light-weight monochromatic B&T papers, to today's beautiful double sided cardstock-weight B&T papers in a variety of colors and patterns, with a zip strip border (how can we improve upon that? lol). Over the last couple of years, my friend Shari has ingrained in my brain "use what you have"...so when you find you have scraps of paper you just can't toss, in this modern day of high-tech, create artwork from your heart to share with a friend! I bet it will brighten your day too.
We show you how to celebrate relationships through discovering your creativity, to preserve and share the moments that matter most. ~CTMH Mission Statement
Monday, November 19, 2012
Saturday, November 17, 2012
Saturday YouTube Video - Cricut Cards and Envelopes
If you don't already own the new CTMH Artiste Cricut Collection...it's definitely a 'must-have' on your Christmas Wish List! The new Artiste Collection takes your creativity over the top!
View the Artiste Flyer for more information.
Watch this video and you'll soon see how you can move beyond flat cards into a whole new dimension with interactive cards using Artiste. So grab a cup of coffee, sit back and enjoy...
Friday, November 16, 2012
November Stamp of the Month ARTWORK
There is still time to purchase the November Stamp of the Month, Capture the Date, stamp set. It's only $5 with a $50 order, or you may purchase it at full retail value of $17.95. Read on to learn how you can get a My Acrylix stamp set for 50% off!
Each person is assigned a paper pack from the Aututmn/Winter 2012 Idea book to use to showcase the Capture the Date stamp set. I was assigned the Scholastic paper, and I embellished my card with the Square Durable Studs and the Harvest Bakers Twine.
And don't forget...you can also take advantage of this month's special promotion Capture the Date, Capture the Savings - ANY STAMP SET FOR 50% OFF. Just place an order for $50 or more, include the November SOM set for $5, and you can choose any stamp set (A-E) at half price! PLUS, to show our support of the Red Cross relief efforts affected by Superstorm Sandy, CTMH will donate $1 for every November SOM set sold in November.
Thursday, November 15, 2012
Holiday Open House
It's been two weeks since my last post...my apologies! Where has the time gone? I know I'm not the only one who is crazy busy this time of year...and at times somethings gotta give...unfortunately, it was blogging and sharing all of my newest creations.
I promise to make it up to you! I have been creating for a Holiday Open House that I participated in 2 weeks ago...it was lots of fun and I met some wonderful ladies...to those of you who stopped by to support all the vendors...thank you! And a BIG thank you goes to MaryBeth for opening up her house to all of us for the day.
I thought you might like to see part of my space...you'll see lots of elements in it. I showcased different Home Decor items for the holidays, my Studio J online scrapbooking album, home-made Christmas cards (some from years past!), upcoming workshops with sign-up sheets, and lots more.
I bet you want to see some close-up views too, right? I couldn't just leave you hangin'... here ya go -
Let's start with the Display Tray, I was inspired by this one from Lisa Stenz, I saw on Pinterest. I used scraps of left over Pear & Partridge paper, and some coordinating cardstock (Cashmere and Cocoa) for photo mats. One of my new favs for the holidays is the Dimensional Elements In Color - Holidays...I'm finding I'm using them alot! The "ho ho ho" is an image cut from the Artiste Cricut Cartridge. I can't wait to include pictures and display this year after year.
Next, the My Creations Star. It's perfect to add that personal touch to your holiday decor, and inexpensive to make one for every holiday! When you purchase the My Creations Star, I will also supply you with a template to use to cover your star with paper of your choice. You can cover one side or both as I did on mine. I used Pear & Partridge paper, Burlap Ribbon, the December 25th stamp set, and a paper medallion from the Artiste Cricut Cartridge.
Lastly, the My Creations Bracket Frame. There are a couple ways you can cover the bracket frame. If you have the Artiste Cricut Cartridge, you can select the image that matches the shape of the frame and select the fit to page button on your machine (which will cut it at 11", but you have to use fit to page button), you'll still need to cut out the center of the frame using a cutting knife and Versamat. Or you can just trace the frame onto your paper, and cut out by hand. I also found it helpful to finish the edges of my paper (once it was adhered to the frame) with the finishing files, then sponged the edges in Cocoa ink. I embellished my frame with more of the Dimensional Elements In Color - Holiday chipboard pieces, and added a little bling with the Sparkle Flourishes.
I have another section of my booth, that I will be sharing with you in the weeks ahead. I have items that appear in the photo that I plan to use as a gift for our team Christmas gift exchange, so I don't want to spoil the surprise, just in case someone from my team stops by for a visit. I will post after our Team Christmas Party on December 1st.
Wednesday, October 31, 2012
Happy Halloween!
Happy Halloween!!!
...to all the ghouls and goblins in blogger land!
I don't do much of the "scary" halloween, I'm more of a "cutesy" halloween creator.
Yes...I'm still using the Perfect Fit - Frames stamp set (I just can't get enough of it...definitely getting my money's worth!) The B&T paper (patterned) comes from the Spellbound kit. The Slate cardstock on the front of the card, was scored, then sanded, highlighting the white core of our papers (I love that about our papers!). I also wrapped the Black Tulle Ribbon around the B&T paper on the front of the cards, tied into a knot. The scallop circle and the matted circle were POPPED using 3-D foam tape to give some additional dimension to the cards:
The other stamp set I used was Perfect Fit- Halloween for the sentiments, and pumpkin.
Have a fun and safe Halloween night!
Monday, October 29, 2012
BOO Banner
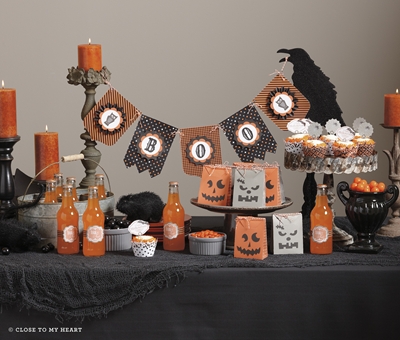
Halloween is just about here...so I thought I would show off my "BOO" banner that I have hanging above my fireplace in my studio, before I pack it away until next year. 
I absolutely fell in love with the Spellbound Cricut kit. The WOTG kit creates a Halloween party for 8 including treat bags, cupcake picks and liners, soda wraps and this banner.
If you're one to throw a Halloween party, you just might want to consider this kit for next year,
but purchase it now...as it won't be carried over to the next catalog.
You'll be sure to impress your guests!!
The papers are so much fun, and only available in this kit...perfect for Halloween!
I'll show you some more artwork Wednesday.
Sunday, October 28, 2012
Studio J = Tricks and Treats
Time is running out, if you haven't taken advantage of the Studio J special in October!
Check out the "Monthly Specials" tab in the menu bar above to get all the details on how you can get a free Studio J layout with your Studio J purchase.
Watch this "Love Your Layout" video, and learn some new tricks in Studio J as you treat yourself to the ultimate online creative experience.
You'll learn how to apply photo filters, create ruffled ribbons and more!
Now, log onto Studio J, and create your own layout!
Warning: Studio J is highly addictive, SO much fun, and without all the mess or supplies needed to create beautiful layouts. It's all online! Try it...I think you'll love it as much as I do!
And don't miss out on your opportunity to save $$$ in October (special ends October 31, 2012) with your Studio J purchase!
Subscribe to:
Posts (Atom)