Showing posts with label Cricut Artiste. Show all posts

Saturday, November 16, 2013

Artbooking Made Easy: Cross-Cartridge Collaboration

While each Cricut® collection from Close To My Heart is a treasure trove all its own, 
together they offer an unmatchable selection of borders, overlays, photo mats, and much, much more! 
The thousands of both classic and trendy die-cuts found within this terrific trio will ensure 
that the projects you make are always uniquely your own. 
Mix 'em, match 'em, and love 'em!


I find it hard to believe, that 3 short years ago, I purchased my first Cricut Expression...until CTMH introduced the Art Philosophy Cricut Cartridge, I never thought I needed a Cricut...now, I rarely create anything without using one of our fabulous cartridges.  I can't wait to make the adorable 3-D boxes in this video...all by mixing & matching our cartridges.  I hope you make some time to create this weekend!  

Holidays are right around the corner...be sure your Santa knows you would love a CTMH Cricut Collection under the tree!  Contact me today!

Z1906  Cricut ARTBOOKING Collection
Z1790  Cricut ARTISTE Collection
Z1686  Cricut ART PHILOSOPHY Collection

Enjoy your weekend!  See you next week...

Tuesday, October 8, 2013

Autumn Pumpkin Paper Crafting

The weather outside has been cooler the last few days, and I'm enjoying my favorite time of year...AUTUMN!  In Colorado, the autumn season doesn't last long enough...I love crisp mornings with afternoon highs in the 60's.  Life is good!

My friend Shari shared this idea with me, and I just had to make one for myself.  

 I've seen something similar posted on Pinterest, in addition to pumpkins, I can see these made with red color cardstock to resemble an apple and give as a small teachers gift too.  
Here's how you make them:
take a 5"x6" piece of cardstock and cut into (8) 3/4" x 5" strips.  If you want to add the tone on tone stamping, do this before assembling your pumpkin.  In this case, I used the flower from the Happy Autumn stamp set, and randomly stamped the 5x6 piece of cardstock before cutting into strips.  

Stack the strips together and pierce a hole in the top and bottom of each piece.  
Add a brad to the top and the bottom of your strips.  
Carefully, flare the pieces out to make a pumpkin shape (this takes some manipulation).  
I cut out images from the Cricut cartridges as follows:

Leaf & Vine - Artiste, pg78, 3D Object, shift <GiveThnk>, cut at 3-3/4"
Black Cat - Artbooking, pg70. Icon, shift <C>, cut at 2-1/4" with Real Dial Size ON
Sentiment Bracket - Artiste, pg33, Accent3, <3>, cut at 1-1/4" in Colonial White, then again at 1-1/2" in Black cardstock.  Stamp set = Holiday Tags.
 I tied the sentiment onto the leaf & vine using Bakers Twine, and added some tan bitty sparkles to the cats eyes.

Wednesday, August 28, 2013

Thoughts from the Heart

Do you enjoy scrapbooking or cardmaking more?  I'm not sure I could give you a definitive answer to that question.  I enjoy it all!  Most importantly, I think I enjoy the "people" that I create with.  I love the friendships that I have developed because of Close To My Heart.  I have friends all over the country that I wouldn't have otherwise met.

I'm beginning the workshops from the Autumn/Winter 2013 Idea Book with the Laughing Lola Cardmaking WOTG kit.  These cards the perfect "pick me up" for a friend.


The cardmaking kit includes the papers (both cardstock and B&T Duo papers), kit-exclusive accessories, cards with envelopes and instructions to create 15 beautiful cards (5 each of 3 designs) inspired by our own Jeanette Lynton.  Even if you're unable to attend the live event, you can create this workshop on your own time with the full color step-by-step instruction guide...order yours today.   This is my therapy!


Monday, August 26, 2013

we all SCREAM for ICE CREAM layout

I love super FUN mail days!  
Recently, I received this amazing layout from my 2nd upline and friend, Michelle Snyder, 
for reaching a sales goal in June 2013.  
Did you realize that during the month of July (specifically July 21st this year), there is a National Ice Cream Day?  How did I not know this?!?!  Well...until now! Oh, how I enjoy ice cream...of all flavors!  

(click on image for more detail)

This layout is so bright and cheerful...I love the vibrant colors (Lagoon, Smoothie, Sunset, Pear and Cream Brulee), and the use of the Silver Shimmer Trim to add some glam.  Michelle also used the Chalk Marker to add highlights to the "Ice Cream" title and the waffle appearance in the ice cream cone.  Brilliant!  The scoops of ice cream and the white background behind the title comes from the Artiste Cricut cartridge (pg36, Accent 3, <6>, cut at 2-1/2" and 4-3/4" respectively). How creative!  She also used the Pixie Glitter Alphabet as part of the title, and used the font from Artiste for "Ice Cream".  I am always inspired by Michelle's artwork!  Thank you, Michelle!  I can't wait to add photos to this layout.


Friday, August 16, 2013

Sarita Cards

More cards from our team shoebox swap...

Now...this is the first time in many years of doing this swap, that 2 people used the same stamp set with the same papers...but the look is completely different!

Vicki and Jodi both used the Sarita papers for their cards...
coincidentally they both used the One-Way Borders stamp set.

First up, Vicki's card.  Did you notice she didn't use any patterned paper at all for her card? However, Vicki's card still has lots of "texture" with the combination of the images in the Borders stamp set and the addition of the Lagoon Houndstooth Washi Tape and Sarita Textiles in place of ribbon.  The sentiment is from one of the exclusive stamp sets included with the Artbooking Cricut collection.


Jodi's card was inspired by the card on page 27 of the new catalog, starts out with a 5x5 card base (cut cardstock 5x10 and fold in half) in Colonial White CS.  A 5x5 piece of Sarita B&T Duo paper covers the front of the card base.  Jodi used Goldrush, Lagoon and Gypsy inks when stamping just one of the borders multiple times.  The "HeLLo" sentiment is from the Artiste cartridge (pg65, Card, shift <B>, cut at 1-1/4" from Outdoor Denim CS).  Also used on her card is the Neutral Bakers Twine and the Trinket Wooden shapes (still one of my favs!) with the new Aqua Dots in the center.

I hope you come back to see more!

Thursday, August 15, 2013

Huntington Cards

More cards from our team shoebox swap...

Both Victoria and Anne-Marie used Huntington papers for their creations.  
I love the Huntington papers...fall colors are my thing!

Here's what Victoria did with her card.  
She used several Art Philosophy (AP) Cricut images for her focal point.
AP Cricut Cartridge: 
pg34, shift <Leaf2>, cut at 2-1/2" from Autumn Terracotta CS and B&T Duo paper
pg34, Layer, shift <Leaf2>, cut at 2-1/2" from Champagne CS
pg56, shift <Leaf4>, cut at 2-1/2 from Olive CS and Saddle CS (leaf veins are dry embossed then sponged with ink to highlight)
pg62, shift <Leaf1>, cut at 1-1/4" from Barn Red CS (cut 2)
pg67, Decorative Layer, shift <Stocking>, cut at 2-3/4" from Desert Sand CS
pg67, <Shape10>, cut at 2-3/4" from B&T Duo paper

The <Leaf2> images were stamped with the flower base image from the Happy Autumn stamp set...I thought this was a very clever idea!  It gives a great texture to the plain cardstock.


Anne-Marie used the Perfect Fit-Thanksgiving stamp set for her holiday themed card.  Her images were cut from the Artiste Cricut cartridge.
Artiste: pg61, Accent 3, <z>, cut at 1-1/4" from Colonial White CS
pg78, Accent 3 <Thnkgvng> cut at 1-3/4" from Colonial White CS
Artbooking: pg75, Photo Mat 2, <Merry>, cut at 3" from Slate CS
Opposing corners were rounded using our new Corner Rounder.   I really like this look, and often forget to do this...it just looks so much more interesting than a standard card with square corners.  
I also like the pop of the Honey CS too.

I still have more to show you...come back and visit again!

Friday, June 28, 2013

Spotlighting TOMMY in July

I'm hosting my monthly WOTG workshops in July using Tommy papers.  I love how these layouts turned out - since the colors in the Tommy papers are basically primary colors, these layouts would be perfect for anything from birthdays, Fourth of July, water pictures, vacation pictures to Disney...endless possibilities.

I used Tommy to scrapbook my trip with my friend Shari to Chicago's Navy Pier after we attended our Regional Celebration.

 (Click on any image to enlarge for more detail)

Products used:
including  Z1824 Tommy Assortment and Z1680 Dimensional Elements Stars

D1576 Home of the Brave (Let's Get Patriotic campaign stamp set)
Inks: Cranberry, Desert Sand, Outdoor Denim
Flip Flaps: 
Z1747 Small Assortment
Z1726  6x6 Flip Flaps
Z4114  4x6 Flip Flaps

On my Chicago Navy Pier layout, I used several different sizes of Flip Flaps (4x4, 6x6 and 4x6)...I don't have pictures of them open. I guess I will have to edit this post after Convention to show the layouts with flip flaps open...I love how Flip Flaps will allow you to add a few more pictures to a 2-page layout without creating another 2-page spread.  My titles were cut from the Artiste cartridge font.

The Happy 4th layout uses the Home of the Brave stamp set.  The Home of the Brave stamp set is just one of 3 stamp sets in our Let's Get Patriotic campaign in July. I thought it was perfect to celebrate Independence Day.  I may not have any firework pictures to include in the layout this year, as Colorado is already "on fire" with all the forest fires currently burning.

Wednesday, June 26, 2013

It's CONVENTION TIME!!!

WooHoo!!! Today, I'm sharing the Convention gifts I made for my team and adoptees who are attending Convention with me.  Since we are in Orlando, and plan to enjoy Disney World while we are here, I knew I had to have a Minnie Mouse theme to my gifts!

My Minnie Gift Bags

These gifts were so easy to make...that is if you have the Artiste Cricut Cartridge.  Want to know how to make them...here are the measurements!
Gift Bag = Artiste, pg.32, 3-D object, cut at 4-1/2"
Bow = Artiste, pg.55, Accent 3, cut at 1-1/4"
Ears = Artiste, pg.48, Card, cut at 3" (cut 2 for her ears)
That's basically the "body" of the Gift Bag...then you can embellish to your desire!

I embellished using a strip of Cranberry cardstock that I scalloped using our Corner Rounder, also included some Slate Washi Tape.  I added some Shimmer Trim just below the Cranberry cardstock, I also used our Glitter Paper to add some "bling" in a scalloped circle behind the monogram stamp.  I added a monogram to each persons gift bag...monograms are a great way to personalize any gift! Each monogram is sold separately for only $2.95 each!  I'm collecting them all.
Inside are fun size m&ms...one for each day of Convention.  A girls gotta have some chocolate!
Hope they enjoy these little gifts!

Monday, June 24, 2013

Artiste + ArtPhilosophy + Later Sk8r = ONE AMAZING WORKSHOP!

I'm hosting this birthday card workshop in July, designed by fellow consultant, Vicki Price at The Price of Paper .  Vicki taught her workshop to our group of consultants during a team training...and I couldn't wait to share it with my stamping friends!  Be ready to be amazed!!!

Card #1

Card #2

Card #3

Card #4

Card #5

Card #7

  Card #8

Card #9

Card #10

Card #11

Card #12

Card #6

Supplies used:
X7167B Later Sk8r Paper Packet
Z1806 Green & Blue Epoxy Bubbles
Z1808 Outdoor Denim Chevron Ribbon
Z1817 Washi Tape - Slate Polka Dot
B1419 Joyful Birthday
B1417 Perfect Fit - Birthday
INKS: Outdoor Denim, Slate, Pear, and Lagoon 


Tuesday, June 4, 2013

Thanks a BUNCH card with A Flowering Bunch


It's JUNE...time to share my June Stamp of the Month artwork.  

My card uses the card pattern from Wishes, Simply Said, and the Tommy paper packet.  The finished size is 8"x3.5".  I also used our White Chalk marker to "stitch" the top and left side of the card 
(much easier than actual needle and thread!).  

I've already had several requests asking how I created the flower...looks complicated, but it's not!  
I was inspired by this pin on Pinterest.  

Here's how I did it:
I cut several hearts (pg.26, <Heart1>, cut at 3/4") from the Art Philosophy cartridge, 
and a flower image (pg.32, Accent 3, <2>, cut at 2") from Artiste that coordinates 
with the Flowering Bunch stamp set. 

Fold or score each heart down the center.


 Join 3 of the hearts together, making clusters, then continue to make 6 clusters of 3 hearts.

Attach each of the clusters to the flower Cricut image.  I used the separation of the "petals" on the Cricut image as my guide to line all 6 clusters up evenly.

 Add an embellishment of your choice to the center of the flower, to hide the middle where the points might not line up perfectly...all imperfections are an opportunity for embellishment! :-) 
That's it!  

Saturday, April 27, 2013

YouTube Saturday Video - Creatively Cricut

It's Creative Time...
allow yourself some creative time this weekend, and I've got just the ticket!

Power up your Cricut and try these tips and tricks for yourself!
This video is jammed packed with awesome tips...but make sure you stay tuned at 7:08 into this video for the BEST tip of all!
Learn the tips and tricks for using die-cut pieces from Close To My Heart's Cricut® Artiste and Art Philosophy collections. Stamp on Cricut®-cut pieces, change the size using special features, and more!

Wednesday, April 24, 2013

More Chicago Regionals Artwork

It's hard to believe all the artwork that we created in just TWO days...jammed packed with creativity!  And I loved every bit of it!

We created this card box, cut from the Artiste Cricut cartridge, and the 6 cards that went with it.  I must admit, I love having all the pieces for each project already pre-cut for us!  I make my customers work with their trimmers...and it's a special treat when I do offer a project that is ready to stamp and assemble.
 You will notice a few products we used on just about everything we created in our two days...Washi Tape, and the Trinkets Wooden Shapes...LOVE THEM!


All these cards were made using the For a Friend stamp set.  Each card is so different from the next...really shows the versatility of the stamps.  Interesting note - only one card uses B&T paper...the rest of the cards are made using only cardstock.  With the addition of the washi tape on the cardstock, it appears more patterned papers were used.

Wait til you see the layouts we created...they are coming up next!

Saturday, March 2, 2013

YouTube Saturday Video: Cricut Fold-ables

It's Creative Time...
allow yourself some creative time this weekend, and I've got just the ticket!
(I can't wait to try these dimensional projects!  HINT: I'm thinking Easter)
Check out this FUN video:


Learn how to create foldable paper pieces cut with the Cricut® Art Philosophy and Artiste cartridges from Close To My Heart. From yo-yos to bows, Cricut®-cut embellishments add something special to any scrapbook page, card, or home décor piece.

Enjoy!

Saturday, February 23, 2013

YouTube Saturday - Project Inspiration: Mini Album


Sit back and enjoy!

Learn how to create an 8" × 5" mini album from start to finish using an eclectic array of papers, stamped images, and Cricut® shapes from Close To My Heart.
Mini Album is shown on page 89 of the Spring/Summer Idea Book.

(Video is approximately 9 minutes)

I can't wait to try this one!  
It just might be an upcoming workshop...what do you think?

Thursday, February 21, 2013

Chantilly Sweet Memories

I'm loving the new papers in the Spring/Summer Idea Book!  

For our group swap, I was assigned a single 12x12 page using the 
Chantilly papers for our Display Board Swap.  
This layout is from our Make It From Your Heart guide 
(contains both layouts and cards, all for a great value of $7.95).  
I found it easier to create a two-page layout and select one page for the swap.  
Here's the companion page:

All products are Close To My Heart:
X7163B Chantilly Paper Pack
C1466 Instant Memories stamp set
D1546 Frame Flair stamp set
9035 Make It From Your Heart Guide (Layout 06)
Z1710 Paradise Paper Flowers
Assorted CTMH Buttons in Blush, Buttercup and Goldrush

I love what our groups created for our swaps all using Chantilly papers:
(click on images for more detail)


Saturday, November 17, 2012

Saturday YouTube Video - Cricut Cards and Envelopes

If you don't already own the new CTMH Artiste Cricut Collection...it's definitely a 'must-have' on your Christmas Wish List!  The new Artiste Collection takes your creativity over the top!

View the Artiste Flyer for more information. 

Watch this video and you'll soon see how you can move beyond flat cards into a whole new dimension with interactive cards using Artiste.  So grab a cup of coffee, sit back and enjoy...

Thursday, November 15, 2012

Holiday Open House

It's been two weeks since my last post...my apologies!  Where has the time gone?  I know I'm not the only one who is crazy busy this time of year...and at times somethings gotta give...unfortunately, it was blogging and sharing all of my newest creations.

I promise to make it up to you!  I have been creating for a Holiday Open House that I participated in 2 weeks ago...it was lots of fun and I met some wonderful ladies...to those of you who stopped by to support all the vendors...thank you!  And a BIG thank you goes to MaryBeth for opening up her house to all of us for the day.

I thought you might like to see part of my space...you'll see lots of elements in it.  I showcased different Home Decor items for the holidays, my Studio J online scrapbooking album, home-made Christmas cards (some from years past!), upcoming workshops with sign-up sheets, and lots more.

I bet you want to see some close-up views too, right?  I couldn't just leave you hangin'... here ya go -

Let's start with the Display Tray, I was inspired by this one from Lisa Stenz, I saw on Pinterest. I used scraps of left over Pear &amp; Partridge paper, and some coordinating cardstock (Cashmere and Cocoa) for photo mats.  One of my new favs for the holidays is the Dimensional Elements In Color - Holidays...I'm finding I'm using them alot!  The "ho ho ho" is an image cut from the Artiste Cricut Cartridge.  I can't wait to include pictures and display this year after year.


Next, the My Creations Star.  It's perfect to add that personal touch to your holiday decor, and inexpensive to make one for every holiday!  When you purchase the My Creations Star, I will also supply you with a template to use to cover your star with paper of your choice.  You can cover one side or both as I did on mine.  I used Pear &amp; Partridge paper, Burlap Ribbon, the December 25th stamp set, and a paper medallion from the Artiste Cricut Cartridge.


Lastly, the My Creations Bracket Frame.  There are a couple ways you can cover the bracket frame.  If you have the Artiste Cricut Cartridge, you can select the image that matches the shape of the frame and select the fit to page button on your machine (which will cut it at 11", but you have to use fit to page button), you'll still need to cut out the center of the frame using a cutting knife and Versamat.  Or you can just trace the frame onto your paper, and cut out by hand.  I also found it helpful to finish the edges of my paper (once it was adhered to the frame) with the finishing files, then sponged the edges in Cocoa ink.  I embellished my frame with more of the Dimensional Elements In Color - Holiday chipboard pieces, and added a little bling with the Sparkle Flourishes.

I have another section of my booth, that I will be sharing with you in the weeks ahead.  I have items that appear in the photo that I plan to use as a gift for our team Christmas gift exchange, so I don't want to spoil the surprise, just in case someone from my team stops by for a visit.  I will post after our Team Christmas Party on December 1st.

Monday, October 29, 2012

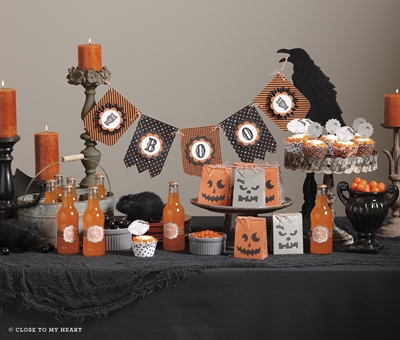
BOO Banner

Halloween is just about here...so I thought I would show off my "BOO" banner that I have hanging above my fireplace in my studio, before I pack it away until next year. 

I absolutely fell in love with the Spellbound Cricut kit.  The WOTG kit creates a Halloween party for 8 including treat bags, cupcake picks and liners, soda wraps and this banner.  


If you're one to throw a Halloween party, you just might want to consider this kit for next year, 
but purchase it now...as it won't be carried over to the next catalog. 
You'll be sure to impress your guests!!

The papers are so much fun, and only available in this kit...perfect for Halloween!  
I'll show you some more artwork Wednesday.

Saturday, October 13, 2012

YouTube Saturday! - Dauber Dynamite

In this video,  Kristine and Monica will show you how to get perfect precision from your inks featuring a stamping technique using sponge daubers for a soft, shaded look.
Catch the RAINBOW with sponge daubers!

Enjoy!


Thursday, October 4, 2012

October Stamp of the Month ARTWORK

OCTOBER Stamp of the Month = Very Merry Christmas  


There are 11 images in the Very Merry Christmas stamp set and perfect for your holiday cards...and did I mention 5 images coordinate with the CTMH Artiste Cricut cartridge...no hand cutting!

I was assigned the Dakota paper pack, and created this Country Christmas card.  My card uses the Bakers Twine - Natural Assortment, Round Durable Studs (love these!), and a rhinestone from the Haunted Assortment (how's that for thinking outside the box LOL).  I used 3-D foam tape to "pop" each element on the ornament to give dimension to my card.  Of course, everything is sponged (ink distressed) in Slate ink.


Here is a sampling of what our group created using this stamp set...and to show the versatility of our papers, each person was assigned one of the different paper packs in the Autumn/Winter Idea Book.  Hope these will inspire you to get an early jump on your holiday cards!

 (click on photos to enlarge them for more detail)
Get the stamp of the month for only $5 when you place a $50 order during the month of October.  If you're ready to start your holiday cards...contact me today!