Showing posts with label 3-D. Show all posts

Friday, September 8, 2017

SEPTEMBER Classes, Specials and More!


Hello Friends!

Happy September, ya'll!  It's my FAVORITE time of year, I adore the Fall season, especially in Colorado with the crisp mornings, warm days and cool nights!  I'm looking forward to seeing the colors change too. What's your favorite season?


I'm sharing another fun, memorable photo from Convention.  For the first time ever, CTMH offered Home Office Tours to Convention attendees.  It was so fun seeing where all the magic happens!  We were able to see the beautiful Lobby, Art Studio, Jeanette's office, Executive Board Room, but none of the production of our acrylic stamps...I was hoping to see that process.  Still, it was great fun to share this experience with my team!

The holidays are coming up on us too, have you seen all the fabulous new product in the NEW Holiday Expressions?!?  Its filled with so many wonderful new products, papers, embellishments, stamp sets and thin cuts...oh my!  My wish list is LONG on this one!

Inside you'll find new Cut Above kits (scrapbooking, card making and tags!), Cats & Bats, Falling for You, Beary Christmas and Silver & Gold.  Grab your favorite beverage, sit back and enjoy all the creativity inside the new Holiday Expressions.   If you need your copy of either the new Annual Inspirations or the Holiday Expressions, please contact me...let's get them in your hands!

This month of September is full, I've got so much going on in other aspects of life.  So, thankfully, I can work CTMH around my crazy schedule.  My workshops for September will be coming later in the month, as I have my nephews wedding this weekend, my 35 year high school class reunion, Vegas next week for a dental convention, our 20th wedding anniversary...somewhere amidst of all of the fun, I will be squeezing in new workshops too!

Feel free to share this blog post with your friends who LOVE to stamp, scrapbook and paper-craft.  I always appreciate your referrals...and I love to reward YOU too!  I sincerely thank you for your continued friendship and support...I truly appreciate YOU!

Helping preserve the memories that matter most ~ YOURS!
Julie


IN THIS ISSUE:
1) September Special - From the Heart card kit
2) Falling for You WYW Scrapbooking Workshop
3) Happy Day WYW Cardmaking Workshop
4) September Stamp of the Month - #S1709 Feel So Blessed
5) SNEAK PEEK to October - Cats & Bats!

1) FROM THE HEART Card Kit - September Monthly Special celebrating National Stamping Month!

The exclusive From the Heart card kit gives you all the materials you need for creating 12 interactive cards, including an E-size stamp set with heartfelt sentiments and stamps you can layer together for exquisitely artistic cards.  Available only during September, this card kit is a must have that will help you create elevated artwork from the heart.

With this special, you can purchase the entire card kit and save 20%!  Or purchase only the stamp set, or purchase additional bases and envelopes to use for other creative projects!

Here are a few additional cards I created (with inspiration from fellow consultant Holly Veselenak) using the kit with addition of coordinating scrap cardstock pieces:


Others, using standard card bases - 

I love the stamp set - it's a must have in my opinion!
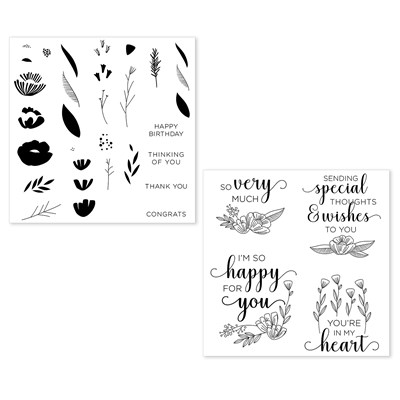
product image

2) Falling For You WYW Scrapbooking Workshop -  Create SIX 2-page layouts (that's 12 pages!) using the "Falling for You" WYW kit, PLUS a package of Falling for You Coordinating Cardstock.

(click on images to enlarge for more detail)


WHEN: (Choose Your Day) - 
Tues, Sept 26th (9a-1pm), Wed, Sept 27th (1-5pm), Fri Sept, 29th (5-9pm), Sat, Sept 30th (9a-1pm)

WHERE: Julie's StampNScrap Studio
RSVP: by Saturday, September 16th (by placing your order with Julie or online)
CLASS FEE:  #G1135 Falling for You WYW kit = $27.95, PLUS 
                         #X7223D Falling for You Coordinating Cardstock = $9.95  
(includes 3 each of Expresso, Fern, Goldrush and Pewter, and we use it all, minimal scraps.  I use several of the lighter side of the two-toned cardstock for the bases and photo mats).  

*I also use 4 sheets of Kraft Cardstock (#Z1375) for base pages - purchase individual sheets from me or bring from your personal stash.

MUST BRING TO PARTICIPATE: 12" paper trimmer, adhesives (tape runner, 3D foam tape, glue dots), scissors, paper piercing tool, baby powder, VersaMat (optional, highly recommended), Memory Protectors for your completed layouts (optional).  No stamping on these pages, no ink, stamps or blocks needed.

3) Happy Day WYW Cardmaking Workshop - Come create 12 cards (6 each of 2 different designs) perfect for Thanksgiving cards, or fall birthday cards!
(click on image to enlarge for detail)


Embellished with leftover Bronze Sequins from the Falling for Your WYW scrapbooking kit:
WHEN: (Choose Your Day)  
Friday, Sept 22nd (9am-1pm) OR (5-9pm), Saturday, Sept 23rd (9am-1pm)

WHERE: Julie's StampNScrap Studio
RSVP by Wednesday, September 13th at 9am (order will be placed by noon)
CLASS FEE: #G1139 WYW Happy Day Cardmaking Kit = #26.95

ADD-ONs include:
*Z4031 Leaves Embossing Folder - I'm happy to share mine for workshop
*X899 Memento BLACK ink pad (does not smear with color mediums used to color images)
*Coloring Medium of choice - I used ShinHan markers (Marigold, Golden Yellow, Leaf Green, Sap Green, Clay, Mahogany, Warm Grey, Pastel Peach and Colorless marker), you may use watercolor paints with water brush, colored pencils, inks & water brush, etc.  

MUST BRING TO PARTICIPATE: 12" paper trimmer, adhesives (tape runner, 3D foam tape), scissors, paper piercing tool, VersaMat (optional, highly recommended), Coloring Medium of choice,  INKS: Memento Black  BLOCKS: 1x1, 2x2, 1x3.5, 3x3

4) September Stamp of the Month - #S1709 Feel So Blessed (set of 26)
Stamps
BEAUTIFUL STAMPS, AMAZING DISCOUNTS!  Each month you can purchase a new D-size stamp set, available for one month only, for just $5 - when you place an order of $50 or more in CTMH products!  That's a savings of over 70% retail, OR simply purchase this set for only $17.95 without a qualifying order, only during the month of September 2017.  View SOM and artwork here

5) SNEAK PEEK to October - here comes Cats & Bats!  More details coming soon!

Cards:

Scrapbooking:


Home Decor:


Wednesday, February 26, 2014

LAST CHANCE - Embossing is Boss!


During the month of February, purchase 2 packs of bulk single or combo colored cardstock and receive your choice of 1 of our 5 new embossing folders FREE!
(Exclusions include: Colonial White, White Daisy, Kraft, and Paper Fundamental Basics Assortment)

HURRY!!! This promotion ends, Friday, February 28th!


In the video, Jill shares some tips on the best way to use our new exclusive embossing folders in trendy and classy patterns:


Here's a card project I offered my All Day Crop customers last weekend.  I always include a creative project with their registration fee, and I usually alternate between a 2 page 12x12 layout and a card project, since most of my gals do both scrapbooking and cardmaking.   I wanted to promote our new embossing folders, and use up some of my retired paper stash.  This is a 3x3 card set with envelopes and a pouch using one of our 4x6 Flip Flaps too!  I used Pemberly (retired) scraps I had on hand and A1119 A Garden (retired) and D1560 Holiday Tags for the cards.  They personalized their cards with the embossing folder (on Kraft cardstock) and sentiment of their choice.  Ink colors used: Desert Sand and Outdoor Denim.
Quickly add an embossed pattern to your paper by slipping it inside one of our 5"x7" (actual size measures 5-1/4"x7-1/4") clear plastic, patterned embossing folders, then pressing with your embossing machine.  All patterns are repeatable for larger papers and work with most embossing machines. 

Check out all the patterns of the new CTMH Embossing Folders (click on links):


Friday, January 24, 2014

Artbooking Made Easy: Elegant Mini Albums

Keeping with the "LOVE" theme from my last few posts...I thought I would share another educational Artbooking video.  Of course, the mini albums that Kristine showcases are quite stunning...but make sure you listen all the way to the end, where Kristine shares some tips on how the Artbooking linked keys work.


I still say "practice makes perfect" or at least almost perfect, when it comes to figuring out how the Artbooking images are cut.  At first, Artbooking was intimidating, and I was having the hardest time getting the cuts I wanted (that's what scrap paper is for).  Now that I've been using it more and more for different projects...the Artbooking cartridge is getting easier and easier to use.  Practice does make perfect!  Stay in and create something beautiful, that will be treasured for a lifetime...

Thursday, January 23, 2014

Artbooking Made Easy: Love, Love, Love

Love making mini albums? Love the Cricut® Artbooking cartridge? Love learning chic techniques for papercrafting? You will love this episode of Artbooking Made Easy, where we show you how to create two trendy looks using re-inker, sponge daubers, and mini album pages cut from the Artbooking cartridge. 
I gotta make one of these!  Absolutely adorable!  

Get your Cricut chirping with the Artbooking cartridge - pages 48 & 49.  With Artbooking, all the keys are linked so that each image is cut proportionately.  Just leave the cut size at 8" and cut away!  If you choose to change the size, as Kristine did with the flower, just use the Real Dial Size button to the size you desire.

Make sure you watch until the end...Kristine shares a cool technique! Another must try...

Saturday, November 16, 2013

Artbooking Made Easy: Cross-Cartridge Collaboration

While each Cricut® collection from Close To My Heart is a treasure trove all its own, 
together they offer an unmatchable selection of borders, overlays, photo mats, and much, much more! 
The thousands of both classic and trendy die-cuts found within this terrific trio will ensure 
that the projects you make are always uniquely your own. 
Mix 'em, match 'em, and love 'em!


I find it hard to believe, that 3 short years ago, I purchased my first Cricut Expression...until CTMH introduced the Art Philosophy Cricut Cartridge, I never thought I needed a Cricut...now, I rarely create anything without using one of our fabulous cartridges.  I can't wait to make the adorable 3-D boxes in this video...all by mixing & matching our cartridges.  I hope you make some time to create this weekend!  

Holidays are right around the corner...be sure your Santa knows you would love a CTMH Cricut Collection under the tree!  Contact me today!

Z1906  Cricut ARTBOOKING Collection
Z1790  Cricut ARTISTE Collection
Z1686  Cricut ART PHILOSOPHY Collection

Enjoy your weekend!  See you next week...

Thursday, November 14, 2013

Sparkle & Shine Gift Tags

This project was created and designed by fellow consultant, Tammy Rusch, for our group swap.  Tammy created a set of gift tags...perfect for those presents under the tree 
or as a handmade gift for a friend.

The packaging that holds all 12 tags is created by using the Sparkle & Shine paper packet, and the Sparkle & Shine WOTG stamp set.

The "Merry and Bright" is on a band that wraps around the gift tag folder, 
it slides off to unveil the tags inside.  Start with an 8-1/2" x 10-3/4" piece of patterned paper or cardstock.  Score paper on 10-3/4" side at 1/2" 3-1/2", 4", 7, 7-1/2, and 10-1/2". Turn paper 90 degrees and score on the 8-1/2" side at 1-1/2" and 6".  Fold to create pockets on long side.  
Use adhesive of choice to seal on the 1/2" sections of the pocket.  
Fold into rectangular box, and secure with band of paper of choice. 

Inside, the tags are stamped using the stamp set from the Season's Tweetings Gift Bag kit.

Great job on your Gift Tag set, Tammy!  Love them!

Friday, November 8, 2013

Artbooking Made Easy - Festive Holiday Mini Album

With the Cricut® Artbooking cartridge from Close To My Heart, your photos will find a cozy home on the pages of a dazzling holiday mini album. Watch the video to gather your own ideas on how to use its themed keys to create merry and bright holiday projects that last.

Monday, October 14, 2013

Artbooking Made Easy - Halloween Mini Albums

Close To My Heart will bring your projects back to life with the Cricut® Artbooking cartridge. Watch this video to learn how to use it while making your own fun Halloween mini albums.

I haven't personally made this one yet...but it's oh, so cute! 
I love the smaller interactive page within the first mini-album.
By now, you know how amazing the Artbooking Cricut cartridge is.
Enjoy!

Please feel free to leave a comment...

Tuesday, October 8, 2013

Autumn Pumpkin Paper Crafting

The weather outside has been cooler the last few days, and I'm enjoying my favorite time of year...AUTUMN!  In Colorado, the autumn season doesn't last long enough...I love crisp mornings with afternoon highs in the 60's.  Life is good!

My friend Shari shared this idea with me, and I just had to make one for myself.  

 I've seen something similar posted on Pinterest, in addition to pumpkins, I can see these made with red color cardstock to resemble an apple and give as a small teachers gift too.  
Here's how you make them:
take a 5"x6" piece of cardstock and cut into (8) 3/4" x 5" strips.  If you want to add the tone on tone stamping, do this before assembling your pumpkin.  In this case, I used the flower from the Happy Autumn stamp set, and randomly stamped the 5x6 piece of cardstock before cutting into strips.  

Stack the strips together and pierce a hole in the top and bottom of each piece.  
Add a brad to the top and the bottom of your strips.  
Carefully, flare the pieces out to make a pumpkin shape (this takes some manipulation).  
I cut out images from the Cricut cartridges as follows:

Leaf & Vine - Artiste, pg78, 3D Object, shift <GiveThnk>, cut at 3-3/4"
Black Cat - Artbooking, pg70. Icon, shift <C>, cut at 2-1/4" with Real Dial Size ON
Sentiment Bracket - Artiste, pg33, Accent3, <3>, cut at 1-1/4" in Colonial White, then again at 1-1/2" in Black cardstock.  Stamp set = Holiday Tags.
 I tied the sentiment onto the leaf & vine using Bakers Twine, and added some tan bitty sparkles to the cats eyes.

Monday, September 30, 2013

A Winter Luminaria using ProPlayer

LAST CALL...  
If you haven't taken advantage of the National Stamping Month exclusive stamp set trio, 
You are My Happy, time is running out fast! HURRY...this special ends TODAY!!!


When you make a purchase of $50 or more, you qualify to get the entire "You Are My Happy" stamp set trio (retail value $47.90) for only $10!  This exclusive trio includes a playful alphabet, light-hearted sentiments, and a variety of fun images to use for countless occasions.  
The same $50 order also qualifies you to get the September Stamp of the Month for only $5.  
JOIN my Mystery Hostess party on my website to take advantage of this amazing special when placing your qualifying order.

Now...are you ready for more Artbooking artwork?
When I first got my hands on the CTMH Autumn/Winter 2013 Idea Book, the first artwork that REALLY caught my eye were the luminaries on page 17.  I knew I would have to make one for myself...and sooner than later!
I made these for my 3-D item for our Board Swap. 

I used the overlay on page 50 of the Artbooking booklet, cut at 5".  I was able to get 6 of the overlays on one sheet of 12x12 paper (each luminary takes 4 overlays, one for each side).  Each corner is made up of a strip of cardstock 1" wide and 5" tall, scored down the center at 1/2", and the overlays are attached using Bonding Memories glue.  Then decorate to your personal taste.  I wanted to show the versatility of the ProPlayer papers, so I embellished my luminary using snowflakes with some bling to reflect the light of the candle inside (it goes without saying...use extreme caution when using a flame next to paper!).  A flameless candle (battery) would be ideal to use, however, I do have a small candle in a jar inside.  

I used snowflakes from the Artbooking cartridge, cut from Slate and White Daisy cardstock in different sizes.  Experiment with different shapes.  The sentiments are from one of the stamp sets from the Art Philosophy Cricut Collection.

Wednesday, June 26, 2013

It's CONVENTION TIME!!!

WooHoo!!! Today, I'm sharing the Convention gifts I made for my team and adoptees who are attending Convention with me.  Since we are in Orlando, and plan to enjoy Disney World while we are here, I knew I had to have a Minnie Mouse theme to my gifts!

My Minnie Gift Bags

These gifts were so easy to make...that is if you have the Artiste Cricut Cartridge.  Want to know how to make them...here are the measurements!
Gift Bag = Artiste, pg.32, 3-D object, cut at 4-1/2"
Bow = Artiste, pg.55, Accent 3, cut at 1-1/4"
Ears = Artiste, pg.48, Card, cut at 3" (cut 2 for her ears)
That's basically the "body" of the Gift Bag...then you can embellish to your desire!

I embellished using a strip of Cranberry cardstock that I scalloped using our Corner Rounder, also included some Slate Washi Tape.  I added some Shimmer Trim just below the Cranberry cardstock, I also used our Glitter Paper to add some "bling" in a scalloped circle behind the monogram stamp.  I added a monogram to each persons gift bag...monograms are a great way to personalize any gift! Each monogram is sold separately for only $2.95 each!  I'm collecting them all.
Inside are fun size m&ms...one for each day of Convention.  A girls gotta have some chocolate!
Hope they enjoy these little gifts!

Tuesday, June 4, 2013

Thanks a BUNCH card with A Flowering Bunch


It's JUNE...time to share my June Stamp of the Month artwork.  

My card uses the card pattern from Wishes, Simply Said, and the Tommy paper packet.  The finished size is 8"x3.5".  I also used our White Chalk marker to "stitch" the top and left side of the card 
(much easier than actual needle and thread!).  

I've already had several requests asking how I created the flower...looks complicated, but it's not!  
I was inspired by this pin on Pinterest.  

Here's how I did it:
I cut several hearts (pg.26, <Heart1>, cut at 3/4") from the Art Philosophy cartridge, 
and a flower image (pg.32, Accent 3, <2>, cut at 2") from Artiste that coordinates 
with the Flowering Bunch stamp set. 

Fold or score each heart down the center.


 Join 3 of the hearts together, making clusters, then continue to make 6 clusters of 3 hearts.

Attach each of the clusters to the flower Cricut image.  I used the separation of the "petals" on the Cricut image as my guide to line all 6 clusters up evenly.

 Add an embellishment of your choice to the center of the flower, to hide the middle where the points might not line up perfectly...all imperfections are an opportunity for embellishment! :-) 
That's it!  

Saturday, May 4, 2013

YouTube Saturday Video: Creating with Canvas

It's Creative Time...
allow yourself some creative time this weekend, and I've got just the ticket!

Use CTMH 6x6 Canvas Displays to create home decor artwork. I can't wait to try this technique!

Learn how to add photos to canvas by using Close To My Heart's My Creations™ canvas display, your favorite photos, tissue paper, and finishing glue.

Wednesday, April 24, 2013

More Chicago Regionals Artwork

It's hard to believe all the artwork that we created in just TWO days...jammed packed with creativity!  And I loved every bit of it!

We created this card box, cut from the Artiste Cricut cartridge, and the 6 cards that went with it.  I must admit, I love having all the pieces for each project already pre-cut for us!  I make my customers work with their trimmers...and it's a special treat when I do offer a project that is ready to stamp and assemble.
 You will notice a few products we used on just about everything we created in our two days...Washi Tape, and the Trinkets Wooden Shapes...LOVE THEM!


All these cards were made using the For a Friend stamp set.  Each card is so different from the next...really shows the versatility of the stamps.  Interesting note - only one card uses B&T paper...the rest of the cards are made using only cardstock.  With the addition of the washi tape on the cardstock, it appears more patterned papers were used.

Wait til you see the layouts we created...they are coming up next!

Monday, April 22, 2013

Fabric Medallion Tutorial


Want to learn how to create this fabric medallion using CTMH For Always Textiles?  
Let Me Show You How...

Start with 2 strips of fabric, each a different size (if you want to stack the finished medallions), so one medallion is smaller than the other.  The white piece here is approximately 1"x7", and the black piece measures 1.5"x10.5".  The strips of fabric can be any size, work with the size that works best for your specific project.  A good rule of thumb is, your finished medallion will be approximately twice the width of your widest strip...this medallion is about 3" wide.
Next, cut each strip into a fringe along the long edge of the fabric.  Be sure to leave about 1/2" at the top intact.  Each fringe is about 1/4" wide...just cut, don't measure anything. 
 Cut each fringed piece at an angle as shown above.  This doesn't need to be perfect, it just gives added texture to the finished product.

 Next, take a needle (from the piercing tool kit) and thread (or embroidery floss), and sew a running stitch (in & out - indicated by white stitching above) across the top of your fringed strip of fabric.  Leaving a tail of thread when you begin and end your stitching.  Again, perfection not necessary...if one stitch is larger than another, it's not going to matter.
Cinch each end of the thread together until the fabric strip gathers into a circle.  Pull tight and tie thread ends into a knot to secure.  Repeat this step with each strip of fabric.
Two medallions, two different sizes.
Stack the smaller medallion onto the larger one.  I just used Liquid Glass to secure the pieces together, but you could sew them together if you choose.  Then embellish the center as desired.  Here I used one of my custom-made buttons from the For Always Textiles (you can read how to do this on my previous post).  The medallion featured on the card, I embellished with a glitter button (Liquid Glass to adhere) and put a sparkle in the center covering up the button holes.  You can never have too much *bling*!
Fast, Simple and Easy!
Be sure to leave a comment if you enjoyed this tutorial.  I hope you try making a fabric medallion for your artwork.  Fabric gives fun texture, and is an element of surprise in papercrafting and it is easy to work with!