Showing posts with label Cricut Art Philosophy. Show all posts

Sunday, March 9, 2014

Embossing...I'm hooked!


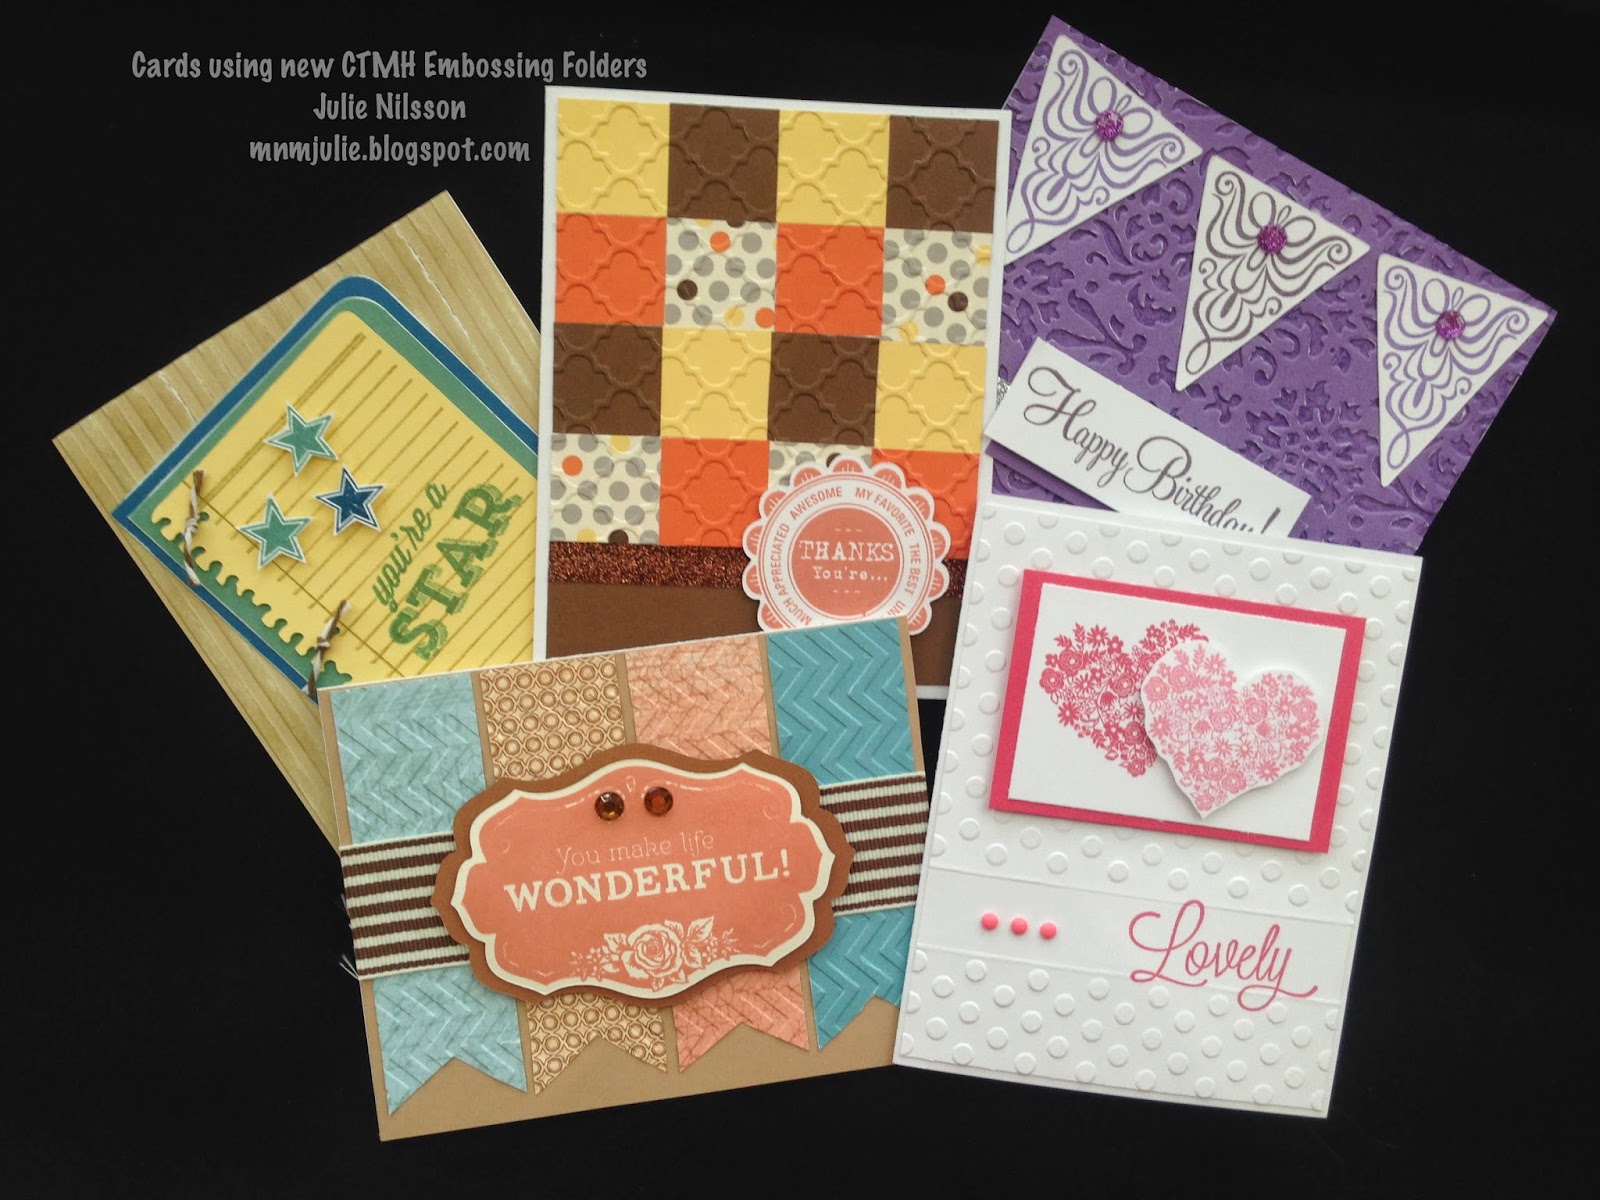
During our team training last week, one of our team members, Randa Wacaster taught us a few techniques using the new CTMH Embossing Folders.  I have been a novice using Embossing Folders until CTMH  introduced our new 5 embossing textures: Dot, Chevron, Quatrefoil, Damask and Stripe.  

After Randa's class, I realize she only got us started...
so many techniques to try, so many different looks.

I know, everyone wants to see a close up of the cards...don't worry, I got your back! LOL

 The "lovely" card obviously uses the DOT Embossing Folder.  Notice the strip that isn't embossed?  It's a perfect spot for your stamped images, and embellishments as shown here.  Just place your card front, not card base (this one is white on white) in the embossing folder about 2/3 of the way, run it through the embossing machine (I have a Cuttlebug), then remove your cardstock, turn your cardstock 180*, line up your impression in the embossing folder leaving about a 1" space from your previous impression, and run it through your machine again.  Then, using your trimmer and a stylist, make a dry embossed line just below and above your impression.  This card uses the stamp set from the Artbooking Cricut Collection, and Flamingo Dots.  Simple, yet elegant.
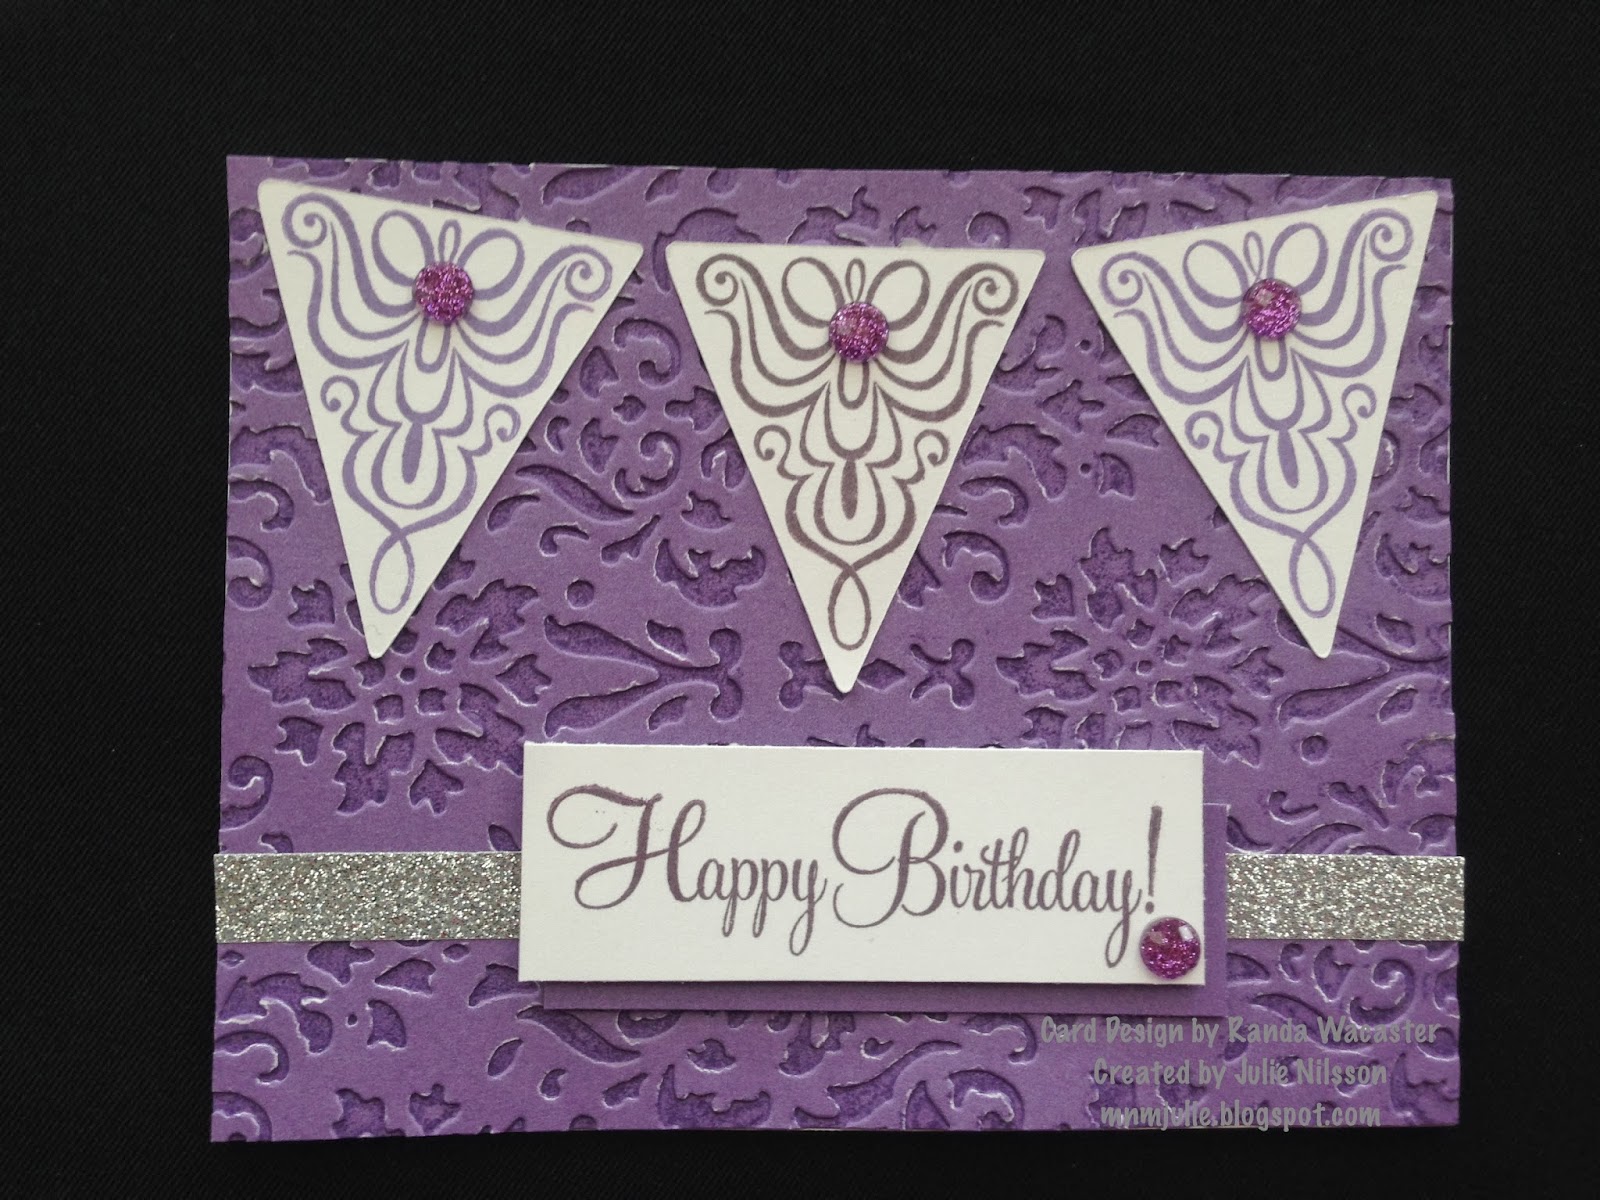

 The "Happy Birthday" card shows a monochromatic texture.  I inked the positive side of the embossing folder with Smokey Plum ink on Gypsy cardstock, and ran my card front through the Cuttlebug embossing machine using the DAMASK embossing folder.  If you ink the negative side of the embossing folder, you get a whole new look...try it!!!  It's so cool!  
This stamp set is one that comes with the Art Philosophy Cricut Collection.  


 The "you're a STAR" card uses the STRIPE embossing folder, and distressed with desert sand ink after it was embossed.  Discovered that you really want to watch the "grain" of your paper, when you cut for embossing.  When I ran the card front through the Cuttlebug against the grain of the paper, the texture looked "cracked", which is a cool technique...but you can avoid the "cracking" if you cut your paper to go along the grain of the paper when you emboss.  The colors used for the card are Bamboo, Pacifica, Juniper and Buttercup.  The stamped images came from the Take Note stamp set with the Artbooking Cricut Collection.  
NOTE: for this project only, the lined notebook paper Cricut image is cut at 3-3/4" not 4" as noted on the stamp carrier sheet.


 The "THANKS" card is a fun and new technique for me, using the Babycakes paper.  It's a great technique to use up some small scraps (if you keep scraps 1x1").  Simply cut enough 1x1" scraps and create your quilt-look on a piece of cardstock (my piece was 4x4), adhere all your squares side by side, and then run through your embossing machine using the QUATREFOIL embossing folder.  We added some Bronze Shimmer Trim and used the sentiment from the Art Philosophy Collection stamp set.
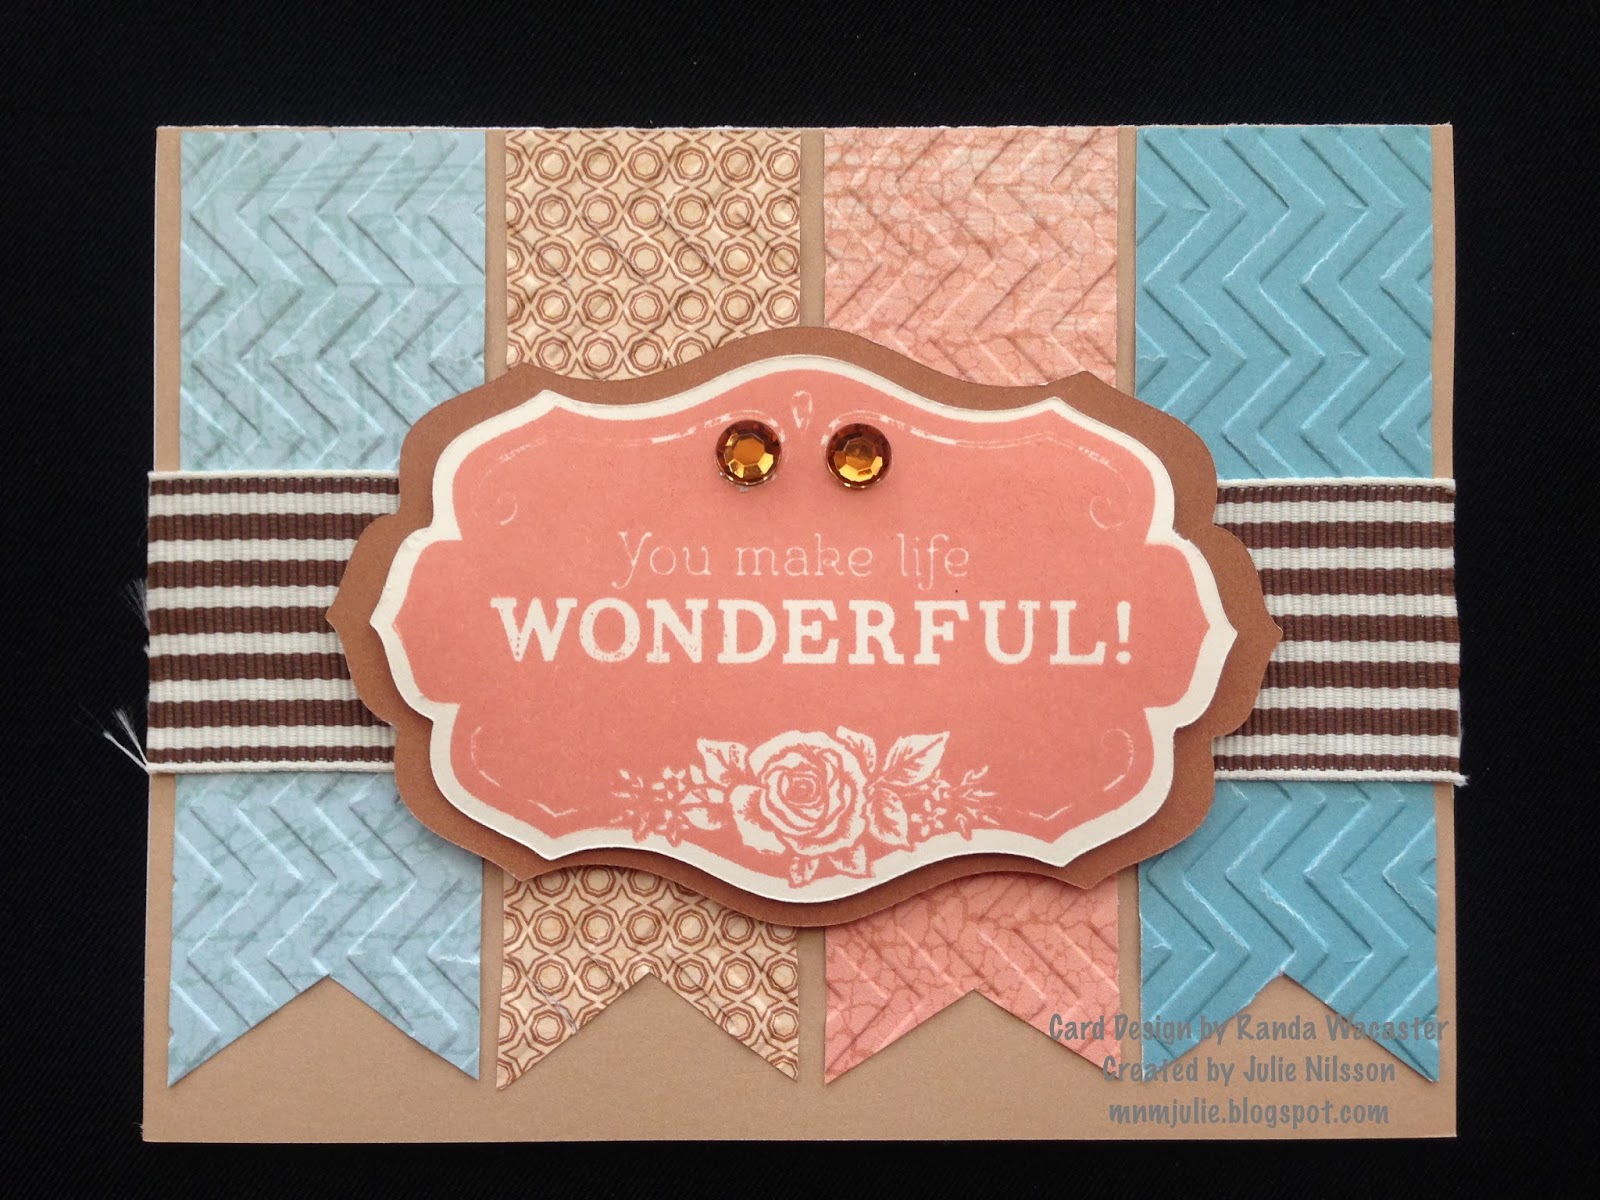

Finally, the "wonderful" banner card uses the CHEVRON embossing folder and the Balloon Ride papers.  This time, we cut the strips of paper, laid the strips of paper onto the embossing folder in the order you want it to show on your card.  Running just the strips of paper through the Cuttlebug, then adhering them to your card front, allows just the banner strips to have the texture, not the whole card. The stamp set is from the Balloon Ride WOTG Scrapbooking kit stamped in Sorbet, and the Chocolate Striped Grosgrain Ribbon (no longer available), and a couple Brown Sparkles for embellishment.

 Randa, thanks for teaching...can't wait to experiment with more techniques!

Embossing quickly adds texture to your paper by slipping it inside one of our 5"x7" (actual size 5-1/4"x7-1/4") clear plastic, patterned embossing folders, then pressing with your embossing machine.  It has been brought to my attention, that the CTMH Embossing Folders do NOT fit the Sizzix Texture Boutique machine (with a 5" opening) without modification.  

Modification is simple (I had a friend share her modification with me) and I'm happy to share her idea with you!  Now she is able to use our Embossing Folders with her Boutique machine. Contact me.

Wednesday, January 22, 2014

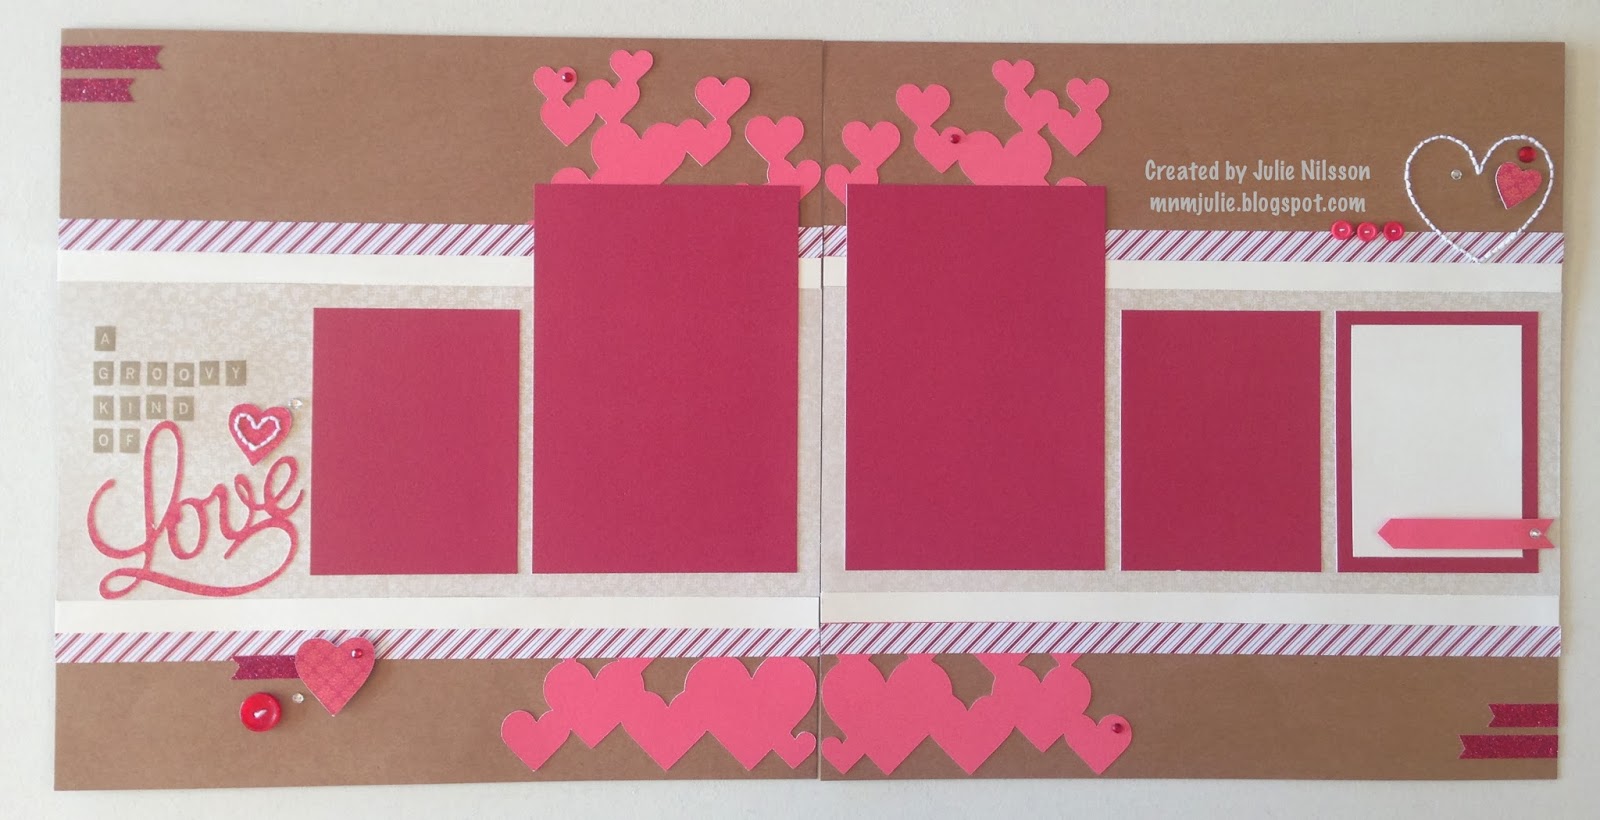
A Groovy Kind of Love Layout

I recently hosted an All Day Crop for my gals and included supplies for a two-page layout in their registration fee.  Valentine's Day is right around the corner, so I created a "LOVE" layout, however, it's generic enough to use for just about any occasion, not just Valentine's Day.  
The layout is Pattern 02 from Make It From Your Heart, Volume 2.  I used Kraft cardstock as the bases for the layout.  I also used a combination of retired B&T papers, Sparkle & Shine, Bliss, and Stella.  Love how all these very different papers come together so nicely.  I rarely create a project without using one or more of the CTMH Cricut cartridges, 
this one is no exception.    


I used the Artbooking cartridge to cut the heart overlay, and the title word "Love".
Heart Overlay - pg48, Overlay, <q>, cut at 11.5" (RealDialSize-RDS)
"Love" - pg61, Title, <f>, cut at 3" (RDS)
Art Philosophy was used to cut hearts too - pg26, shift <Heart1>, cut at 3/4", 1" and 1.25"

 I used Keyboard Alphabet in Desert Sand ink to stamp out the title of the layout.  
The Stitch Guide and Foam Mat came in handy as I pierced the heart shape onto the cardstock and stitched using white Bakers Twine.  The layout also used several coordinating embellishments to accent the pages.  Clear Sparkles, Red Sparkles, buttons, and Red Shimmer Trim

Saturday, November 16, 2013

Artbooking Made Easy: Cross-Cartridge Collaboration

While each Cricut® collection from Close To My Heart is a treasure trove all its own, 
together they offer an unmatchable selection of borders, overlays, photo mats, and much, much more! 
The thousands of both classic and trendy die-cuts found within this terrific trio will ensure 
that the projects you make are always uniquely your own. 
Mix 'em, match 'em, and love 'em!


I find it hard to believe, that 3 short years ago, I purchased my first Cricut Expression...until CTMH introduced the Art Philosophy Cricut Cartridge, I never thought I needed a Cricut...now, I rarely create anything without using one of our fabulous cartridges.  I can't wait to make the adorable 3-D boxes in this video...all by mixing & matching our cartridges.  I hope you make some time to create this weekend!  

Holidays are right around the corner...be sure your Santa knows you would love a CTMH Cricut Collection under the tree!  Contact me today!

Z1906  Cricut ARTBOOKING Collection
Z1790  Cricut ARTISTE Collection
Z1686  Cricut ART PHILOSOPHY Collection

Enjoy your weekend!  See you next week...

Thursday, August 15, 2013

Huntington Cards

More cards from our team shoebox swap...

Both Victoria and Anne-Marie used Huntington papers for their creations.  
I love the Huntington papers...fall colors are my thing!

Here's what Victoria did with her card.  
She used several Art Philosophy (AP) Cricut images for her focal point.
AP Cricut Cartridge: 
pg34, shift <Leaf2>, cut at 2-1/2" from Autumn Terracotta CS and B&T Duo paper
pg34, Layer, shift <Leaf2>, cut at 2-1/2" from Champagne CS
pg56, shift <Leaf4>, cut at 2-1/2 from Olive CS and Saddle CS (leaf veins are dry embossed then sponged with ink to highlight)
pg62, shift <Leaf1>, cut at 1-1/4" from Barn Red CS (cut 2)
pg67, Decorative Layer, shift <Stocking>, cut at 2-3/4" from Desert Sand CS
pg67, <Shape10>, cut at 2-3/4" from B&T Duo paper

The <Leaf2> images were stamped with the flower base image from the Happy Autumn stamp set...I thought this was a very clever idea!  It gives a great texture to the plain cardstock.


Anne-Marie used the Perfect Fit-Thanksgiving stamp set for her holiday themed card.  Her images were cut from the Artiste Cricut cartridge.
Artiste: pg61, Accent 3, <z>, cut at 1-1/4" from Colonial White CS
pg78, Accent 3 <Thnkgvng> cut at 1-3/4" from Colonial White CS
Artbooking: pg75, Photo Mat 2, <Merry>, cut at 3" from Slate CS
Opposing corners were rounded using our new Corner Rounder.   I really like this look, and often forget to do this...it just looks so much more interesting than a standard card with square corners.  
I also like the pop of the Honey CS too.

I still have more to show you...come back and visit again!

Monday, June 24, 2013

Artiste + ArtPhilosophy + Later Sk8r = ONE AMAZING WORKSHOP!

I'm hosting this birthday card workshop in July, designed by fellow consultant, Vicki Price at The Price of Paper .  Vicki taught her workshop to our group of consultants during a team training...and I couldn't wait to share it with my stamping friends!  Be ready to be amazed!!!

Card #1

Card #2

Card #3

Card #4

Card #5

Card #7

  Card #8

Card #9

Card #10

Card #11

Card #12

Card #6

Supplies used:
X7167B Later Sk8r Paper Packet
Z1806 Green & Blue Epoxy Bubbles
Z1808 Outdoor Denim Chevron Ribbon
Z1817 Washi Tape - Slate Polka Dot
B1419 Joyful Birthday
B1417 Perfect Fit - Birthday
INKS: Outdoor Denim, Slate, Pear, and Lagoon 


Tuesday, June 4, 2013

Thanks a BUNCH card with A Flowering Bunch


It's JUNE...time to share my June Stamp of the Month artwork.  

My card uses the card pattern from Wishes, Simply Said, and the Tommy paper packet.  The finished size is 8"x3.5".  I also used our White Chalk marker to "stitch" the top and left side of the card 
(much easier than actual needle and thread!).  

I've already had several requests asking how I created the flower...looks complicated, but it's not!  
I was inspired by this pin on Pinterest.  

Here's how I did it:
I cut several hearts (pg.26, <Heart1>, cut at 3/4") from the Art Philosophy cartridge, 
and a flower image (pg.32, Accent 3, <2>, cut at 2") from Artiste that coordinates 
with the Flowering Bunch stamp set. 

Fold or score each heart down the center.


 Join 3 of the hearts together, making clusters, then continue to make 6 clusters of 3 hearts.

Attach each of the clusters to the flower Cricut image.  I used the separation of the "petals" on the Cricut image as my guide to line all 6 clusters up evenly.

 Add an embellishment of your choice to the center of the flower, to hide the middle where the points might not line up perfectly...all imperfections are an opportunity for embellishment! :-) 
That's it!  

Saturday, April 27, 2013

YouTube Saturday Video - Creatively Cricut

It's Creative Time...
allow yourself some creative time this weekend, and I've got just the ticket!

Power up your Cricut and try these tips and tricks for yourself!
This video is jammed packed with awesome tips...but make sure you stay tuned at 7:08 into this video for the BEST tip of all!
Learn the tips and tricks for using die-cut pieces from Close To My Heart's Cricut® Artiste and Art Philosophy collections. Stamp on Cricut®-cut pieces, change the size using special features, and more!

Saturday, March 2, 2013

YouTube Saturday Video: Cricut Fold-ables

It's Creative Time...
allow yourself some creative time this weekend, and I've got just the ticket!
(I can't wait to try these dimensional projects!  HINT: I'm thinking Easter)
Check out this FUN video:


Learn how to create foldable paper pieces cut with the Cricut® Art Philosophy and Artiste cartridges from Close To My Heart. From yo-yos to bows, Cricut®-cut embellishments add something special to any scrapbook page, card, or home décor piece.

Enjoy!

Saturday, February 23, 2013

YouTube Saturday - Project Inspiration: Mini Album


Sit back and enjoy!

Learn how to create an 8" × 5" mini album from start to finish using an eclectic array of papers, stamped images, and Cricut® shapes from Close To My Heart.
Mini Album is shown on page 89 of the Spring/Summer Idea Book.

(Video is approximately 9 minutes)

I can't wait to try this one!  
It just might be an upcoming workshop...what do you think?

Thursday, October 11, 2012

Monogram & Perfect Fit = Tutorial

I've seen so many ideas floating around on social media using the Perfect Fit - Frames stamp set...it's one of my VERY used stamp sets of late.  I love this stamp set...it's just so versatile!

One day, I found this 3x3 card & tote idea on Pinterest (anyone else addicted?), and unfortunately I didn't pin it (what was I thinking???, obviously I studied it enough to re-create it)...and now I can't find the original pin to give credit.  I thought this project would be a good one to do a picture tutorial for...here's the finished project:


 STEP 1: Take a piece of cardstock, 8" x 7-1/4", on the 8"side, score at 2" and 4".  On the 7-1/4" side, score at 2", then flip the cardstock over and score at 2" again.  It should look like this:


STEP 2: Next, measure down 2"and mark the left and right edge of the cardstock.  Make a diagonal cut from your mark to the score line as shown below:


 STEP 3: Cut the middle section to the first score line on both sides as shown:


STEP 4: Adhere piece of patterned paper measuring 1-3/4" by 3"to the lower middle section, centered between the score lines, leaving a border, as shown:


STEP 5:  Cut 2 pieces of patterned pieces measuring 1-3/4" x 3-3/4".  Next, measure down 1-3/4" and mark the left side of one piece, and the right side of the second piece.  Again, make a diagonal cut from your pencil mark to the opposite corner, as shown on each piece.  These will be the sides of your box.


STEP 6: Adhere the two side pieces, centered between the score lines, leaving a border as shown:


STEP 7:  Next, flip your project over, and add a strong adhesive (I used a sticky strip) to the areas shown:


STEP 8:  Carefully, bring up the center pieces on each side, and wrap the bottom pieces around to create a portion of the box as shown:


STEP 9:  Next, bring the sides of the box to meet the bottom portion of the box, adhering the sticky strip as shown:


 STEP 10:  The box is almost finished!  Make sure all your adhesive is stuck well...I usually take my bone folder and press firmly where I have placed my adhesive.


 STEP 11:  Next, I measured about 3/8"-1/2" from top of box, and centered from left to right, using an oval punch, I created a "handle" for the box:


STEP 12:  Create 3x3 cards to fit inside your box.  Any design will work!  My cards use the Clementine papers, and I used the Perfect Fit - Frames and the personalized Monogram stamps, each letter of the alphabet is sold separately...just $2.95 per letter.  Did I mention that all 4 images on the Perfect Fit - Frames stamp set coordinates with the Art Philosophy Cricut Cartridge?  They do!  How's that for fast, simple and easy!  Just cut the shape on the Cricut, and stamp!

Shhh...I'm giving these to some good friends this weekend as little goodies at our scrapbook retreat!  I sure hope they like them.

I hope I have inspired you to create a project like this...and if you do, please leave a link so I can see what you made.  If you have any questions, please post a comment below, and I will do my best to clarify.  If you enjoyed this picture tutorial, and would like to see more of these, please leave a comment.  I would love any feedback.  Thanks!


Monday, May 7, 2012

Pemberley WOTG in May

I'm offering the Pemberley WOTG (Workshop-on-the-Go) as one of my workshops for May.  What I love most about the WOTG kits, is the value!  For just $29.95 (Retail Value of $34.78) you'll receive a full Pemberley paper packet, an exclusive Pemberley workshop C-size stamp set, 2 sheets of Colonial White 12x12 cardstock, Bouquet Assortment, Bitty Opaque Pearl Adhesive Gems, and an instructional brochure to create 4 pages...and enough product left over to create cards too!

This month, I made an adaptation to the layout in the instructional brochure...which is allowed!  Remember, you can follow the brochure step by step or use it as inspiration to make your own artwork.  I did just that...I used the same techniques and even the same title, I just changed up the layout design to work better for the pictures I take.  My personal scrapbooking style isn't one for lots of "open" space on a layout...which the one in the brochure had, in my opinion.

Layout #1: Mesmerize from the Magic Scrapbooking Program. If you like how I adapted this layout, you can get the cutting diagram for Mesmerize here.
Layout #2: Transfigure from the Magic Scrapbooking Program.
Pemberley Bonus Project includes 5 Cricut cards too!
Each card base was cut using the Art Philosophy Cricut cartridge...if you don't have it yet, you REALLY should consider it...it's a MUST HAVE!!! I use it for SO many projects, including 3-D boxes, and more.

Thursday, March 1, 2012

Philosophy of FUN

Have you heard the news? Want to know how you can get this for FREE? Read on...
Now is a GREAT time to join Close To My Heart! 
 Because when you sign up between March 1-31, 2012 you'll receive a FREE Cricut Art Philosophy collection! The collection's retail price of $99 adds incredible value to the New Consultant Kit (see Join My Team) and will give you hours of creative fun! Do you know what's included in our Cricut collection?...a CTMH exclusive Cricut cartridge (with over 700 images), three coordinating My Acrylix D-size stamp sets, and three sheets of matching Dimensional Elements shapes! If you already own the collection, we got you covered... you can choose to receive $100 in select product credit instead.

Watch this video for more information:


If you're ready to Join My Team, it's just a click away, 
and the enrollment process just takes a few minutes!

Monday, December 19, 2011

Medallion Wreath

When I saw a similar wreath (made by Corina Mitchell) at our CTMH Convention this year...I knew I had to give it a try! I just didn't realize how long it would take to make the medallions! Here it is, the gift I gave away for our gift exchange. I'll show the gift I received on Wednesday, so stop by again!
My wreath is made up of 19 different medallions, using colors from the Wonderland paper packet. The 5 largest medallions make up the base using 3"x12" strips of paper (2 strips per medallion) scored at 1/2" increments. Keep making medallions using 2-1/2" x 12", 2"x12", 1-1/2"x12" and 1"x12" strips of papers, until you have enough to cover the metal wire base.
Then comes embellishments...have fun with it! I used several different products for the centers of each medallion, from Shimmer Brads, Bigger Brads, Bling Assortment, and Pearl Opaques. I also cut out several snowflakes (pg.22) from the CTMH Art Philosophy Cricut cartridge, and covered them in Prisma Glitter for additional sparkle! I created the hanger for the wreath by including a 36" piece of Dark Chocolate Striped Grosgrain.