We show you how to celebrate relationships through discovering your creativity, to preserve and share the moments that matter most. ~CTMH Mission Statement
Showing posts with label Layout. Show all posts
Sunday, September 7, 2014
Fun & Sun Layout using Artbooking
Often, I host All Day Crops at my home...12 hours of scrapping fun! This was the layout everyone made for our August 2014 Crop. I figured most everyone would have lots of summer time pictures yet to scrapbook...so the layout seemed appropriate. The photo mat sizes are 4x6 too, so they are ideal for Flip Flaps! Flip flaps are perfect when you want to add additional photos to your layouts. I haven't added them to mine yet, still have photos to develop, but they have been taken. I figure I'll finish up this layout during the cold months of winter...to bring the warmth back!
The title, grass and sun cut outs are images from the fabulous Artbooking Cricut Collection. The cardstock papers unfortunately have recently retired, and no longer able to purchase...however, it's a perfect way to use up your stash! The layout bases are Twilight cardstock, the middle section is Sky cardstock, and the striped pattern paper goes way back to the Tinkerin' paper pack. I also embellished with a few gold sequins. A simple layout, but has the opportunity to hold many, many photos!
Rummage through your stash of papers (if you're like me, you need a 12 step program! LOL) and discover what's new again! Create a layout of your summer time memories!
Saturday, March 22, 2014
The Great Outdoors
Today, I am hosting an All Day Crop (10am-10pm), and here's the layout we created. I pre-cut papers, and provide embellishments for the layout, its all included in their registration fee. This layout uses the new Timberline papers, the title, Great Outdoors (cut at 11" no real dial size) came from page 66 of the Artbooking Cricut cartridge booklet, and I threw in some older embellishments that are no longer available...trying to use up my stash. The stamping is from the Catch You Later stamp set. Colors are Bamboo (bases), Chocolate, Twilight, and Ponderosa Pine.
I want to add photos to this layout so bad!...and sadly, I don't have any outdoor or camping pictures that I haven't already scrapbooked! Guess it's time to take some new ones! Glad Spring and Summer are right around the corner (I have to keep telling myself that, today was cold, snowy and frosty!)
Edit to Post on 5/3/2014:
I found pictures for my layout, and I used Flip Flaps to include more than just the few pictures shown on the layout. Here's what the layout looks like with photos...
Edit to Post on 5/3/2014:
I found pictures for my layout, and I used Flip Flaps to include more than just the few pictures shown on the layout. Here's what the layout looks like with photos...
I love how these pages turned out! The Timberline papers are quickly becoming one of my favorites!
Tuesday, February 25, 2014
Celebrate LIFE layout
Earlier this month, I hosted my new Catalog Celebration for a full house crowd! I have grown to become good friends with so many of my wonderful supporters...you know who you are! And I thank you!!!
I always forget to take pictures during this event...I always think about it before hand, but then get so involved with showing off new products, teaching our creative project, playing BINGO - CTMH style, and giving away prizes...I get lost in all the FUN!
Here's our Make-n-Take for this year. In the past, I have offered a 12x12 page...but this year, I offered a two page layout for just a few dollars more. Each and every one of my guests took the two page offer!
The following products are used in this layout:
I always forget to take pictures during this event...I always think about it before hand, but then get so involved with showing off new products, teaching our creative project, playing BINGO - CTMH style, and giving away prizes...I get lost in all the FUN!
Here's our Make-n-Take for this year. In the past, I have offered a 12x12 page...but this year, I offered a two page layout for just a few dollars more. Each and every one of my guests took the two page offer!
(click on layout for more detail)
I try to introduce as many new products as possible, and still be tasteful, and in a CTMH style!
I love the mix of B&T papers here (Ariana, Jubilee and Balloon Ride).
The following products are used in this layout:
Marquee Uppercase stamp set
This Is Good stamp set (exclusive Hostess Reward)
Doodle Signs stamp set (exclusive Hostess Reward)
Smoothie Striped Washi Tape
Gold Polka Dot Washi Tape
Chocolate Woodgrain Washi Tape
Triangle Stud Durables
Craft Queen Base & Bling Charms
Ink Colors used: Crystal Blue, Smoothie, Honey, Sweet Leaf and Chocolate
Smoothie Striped Washi Tape
Gold Polka Dot Washi Tape
Chocolate Woodgrain Washi Tape
Triangle Stud Durables
Craft Queen Base & Bling Charms
Ink Colors used: Crystal Blue, Smoothie, Honey, Sweet Leaf and Chocolate
Wednesday, January 22, 2014
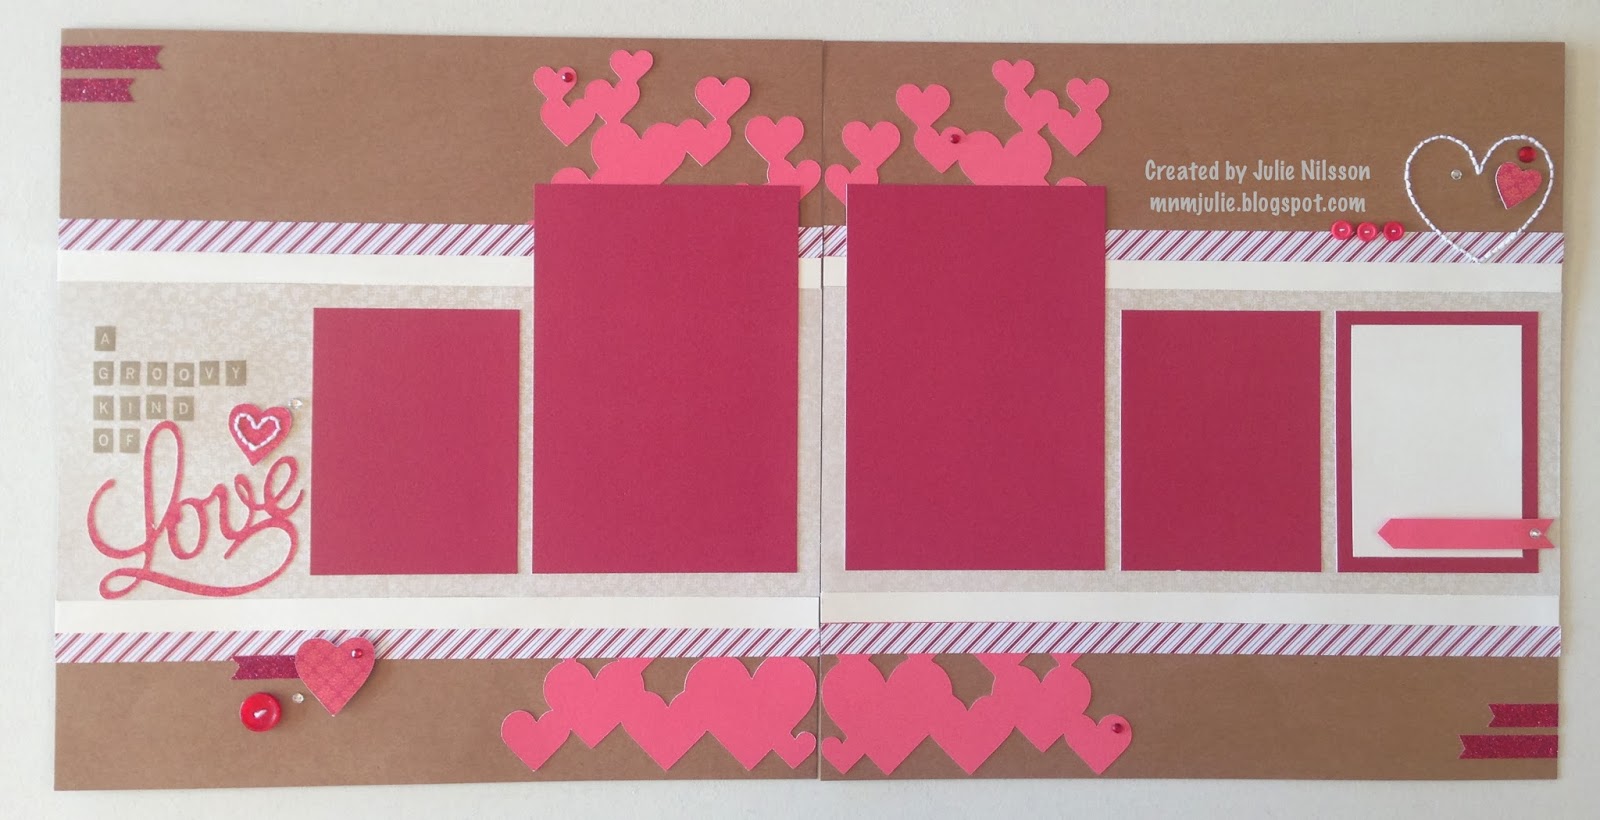
A Groovy Kind of Love Layout
I recently hosted an All Day Crop for my gals and included supplies for a two-page layout in their registration fee. Valentine's Day is right around the corner, so I created a "LOVE" layout, however, it's generic enough to use for just about any occasion, not just Valentine's Day.
I used Keyboard Alphabet in Desert Sand ink to stamp out the title of the layout.
The Stitch Guide and Foam Mat came in handy as I pierced the heart shape onto the cardstock and stitched using white Bakers Twine. The layout also used several coordinating embellishments to accent the pages. Clear Sparkles, Red Sparkles, buttons, and Red Shimmer Trim
The layout is Pattern 02 from Make It From Your Heart, Volume 2. I used Kraft cardstock as the bases for the layout. I also used a combination of retired B&T papers, Sparkle & Shine, Bliss, and Stella. Love how all these very different papers come together so nicely. I rarely create a project without using one or more of the CTMH Cricut cartridges,
this one is no exception.
I used the Artbooking cartridge to cut the heart overlay, and the title word "Love".
Heart Overlay - pg48, Overlay, <q>, cut at 11.5" (RealDialSize-RDS)
"Love" - pg61, Title, <f>, cut at 3" (RDS)
Art Philosophy was used to cut hearts too - pg26, shift <Heart1>, cut at 3/4", 1" and 1.25"
I used Keyboard Alphabet in Desert Sand ink to stamp out the title of the layout.
The Stitch Guide and Foam Mat came in handy as I pierced the heart shape onto the cardstock and stitched using white Bakers Twine. The layout also used several coordinating embellishments to accent the pages. Clear Sparkles, Red Sparkles, buttons, and Red Shimmer Trim
Saturday, November 9, 2013
12x12 Sparkle & Shine - get ready to preserve holiday memories
I'm loving the Sparkle & Shine papers and embellishments! Have you taken advantage of the Holidays from the Heart Special yet? It's simple...just place an order of $100 or more, and choose a "star" item from the Holiday Gift Guide (retail value of free product ranges from $4.95 to $17.95).
Here's is my 12x12 scrapbook page I created for our team board swap...I promise to share our groups artwork this weekend.
I have plans for the opposite page...you'll be seeing it soon! For this page, I used the Sparkle & Shine paper...can you believe I only used 1 sheet of the B&T paper? I also used the Sparkle & Shine Washi Tape 3-pack in the holiday gift guide...and it makes it look like I used several different patterned papers. I also used the Magical Days stamp set for a unique way to add the year (which I got free with my $100 order!) and the Trim the Tree stamp set, and the Sparkle Holiday Shapes. I added some bling using the Silver Shimmer Trim and the Silver Glitz Glitter Gel...don't you love how it all comes together? This page is the left page of pattern #11 from the Make It From Your Heart, Volume 2 how to book. The title (merry & bright) is cut from the Artbooking cartridge in Ruby and White Daisy cardstock...pg. 56, Title, <o>, cut at 10" (NO Real Dial Size). I shadowed the title cutting a second "merry & bright" in White Daisy Cardstock and just offset the two images. I have found the best adhesive to use with the "welded" titles and the overlays is the Bonding Memories glue pens.
Thursday, October 3, 2013
Trick or Treat with Artbooking
MY CONFESSION:
When my upline, Michelle Snyder, shared her Halloween layouts...I knew I had to scrap-lift her amazing artwork!
Thanks, Michelle!
Isn't this layout stinkin' cute?
For the layout, I used the 1/2 overlay (corner spiderweb) cut from the Silver Glitter Paper. The spider web overlay can be found on page 70 in the Artbooking booklet, you guessed it, the size dial is set at 11" for the spider web. The title "Trick or Treat" is from page 55 in Artbooking, and this one was set at 6" since this key is designed for a 6" Halloween themed mini album...I might just need to make that too! I added the zip strips from Laughing Lola papers, and matted my photo spaces with Laughing Lola papers too. My base pages are Lagoon, with a piece of 11x11-1/2" Black cardstock on each, leaving a 1/2" border around 3 sides and coming together in the center. Each Sunset square measures 2-1/4". The photo mat on the left page measures 5-3/4"x7-3/4", and the Lagoon cardstock measures 5-1/4"x7-1/4" for a 5x7 photo. The larger of the two photo mats on the right page measures 5-3/4"x5-3/4" and the Lagoon cardstock measures 5-1/4"x5-1/4" for a 5x5 photo. The smaller photo mat measures 4-1/4"x3" with the Lagoon cardstock measuring 3-3/4"x2-1/2" for a wallet size photo.
Growing up, Halloween was one of my favorite holidays...I always enjoyed dressing up in costume and going door to door trick or treating. I have lots of happy memories of Halloween's past. Since moving to the country 16 years ago, and living in Colorado's high country...Halloween is usually our first cold spell of the season.
So...now that you have seen how you can coordinate papers to work for Halloween, I hope you create some special moments this Halloween, and preserve your memories in scrapbooks!
Monday, August 26, 2013
we all SCREAM for ICE CREAM layout
I love super FUN mail days!
Recently, I received this amazing layout from my 2nd upline and friend, Michelle Snyder,
for reaching a sales goal in June 2013.
Did you realize that during the month of July (specifically July 21st this year), there is a National Ice Cream Day? How did I not know this?!?! Well...until now! Oh, how I enjoy ice cream...of all flavors!
(click on image for more detail)
This layout is so bright and cheerful...I love the vibrant colors (Lagoon, Smoothie, Sunset, Pear and Cream Brulee), and the use of the Silver Shimmer Trim to add some glam. Michelle also used the Chalk Marker to add highlights to the "Ice Cream" title and the waffle appearance in the ice cream cone. Brilliant! The scoops of ice cream and the white background behind the title comes from the Artiste Cricut cartridge (pg36, Accent 3, <6>, cut at 2-1/2" and 4-3/4" respectively). How creative! She also used the Pixie Glitter Alphabet as part of the title, and used the font from Artiste for "Ice Cream". I am always inspired by Michelle's artwork! Thank you, Michelle! I can't wait to add photos to this layout.
Sunday, April 28, 2013
Claire Self-Portrait
One last page we created at Chicago Regionals.
Rarely do I scrapbook only ME...I'm usually behind the camera.
On the first day of the event, each of us had our picture taken...I should have known to be more prepared...I'm in a group of scrapbookers! Its not the best picture I've ever taken, but I decided to use it anyway...it's one more completed page!
This page uses more of the Claire papers, and a Large My Creations Paper Pouch. The pouch is a pocket to hide any journaling...it's one way to keep the page clean (especially if you don't like your own handwriting) and keeps the focus on the picture.
We were given 3 questions to prompt us for journaling about ourselves:
Why did you join Close To My Heart?
What makes you stay?
What have you found along the way that you never would have expected?
Friday, April 26, 2013
You Make My HEART Soar
Here's another layout we created at the Chicago Regionals.
(Click on any image to enlarge for more detail)
I can't tell you the last time I created a layout, using only cardstock!
There isn't one piece of patterned paper on this layout...none.
Another one of my new favorite stamp sets is the Sightseer stamp set that we used on this layout...we also used the Keyboard Kraft Alphabet...it's wonderful...so many letters, numbers, symbols and punctuation. The word "HEART" was cut using the Artiste...and unfortunately, many of the images in the Sightseer stamp set have to be cut the old fashion way...with scissors.
I'm spoiled, turning to my Cricut to cut just about anything.
These pages have lots of dimension...using 3-D foam tape to "pop" the paper airplane, the camera, and the people figures. The black cardstock strip is accordion folded into pleats like ribbon, and the wooden shapes bring another element of texture into the layout.
And...did you notice? I didn't even ink distress either!
Off to find pictures to put on all my new layouts!
Thursday, April 25, 2013
A Bushel and a Peck
Here's one of the layouts we created at the Chicago Regionals.
(Click on any image to enlarge for more detail)
The layout uses the Claire papers, the Trinket Wooden Shapes and the Patterned Pennants stamp set. The title "a bushel and a peck" was created using the negative image cut from the Artiste Cricut cartridge. The negative images seem to be such a hot trend right now. One tip that I can share with you, I learned at Regionals...when you are cutting a title on your Cricut, and you plan to use the negative image, do not have the Material Saver button on. Program your Cricut to cut the entire title at once making sure to place a "space" between each word. (NOTE: I'm posting a Cricut video with lots of tips and techniques coming on Saturday...be sure to check it out!)
The banners were cut with the Cricut and then stamped with one of the patterned pennants. I love seeing how to use stamp images in a different way. This stamp set is also perfect to use to make faux washi tape...just by stamping a portion of the image on the edge of your artwork...it looks just like washi tape was used (I didn't do that on this layout).
The sunshine rays in the bottom right corner were also made by just using the tip portion of the patterned pennants. So glad to have this stamp set now...I can see so many more uses for it!
Thursday, February 21, 2013
Chantilly Sweet Memories
I'm loving the new papers in the Spring/Summer Idea Book!
For our group swap, I was assigned a single 12x12 page using the
Chantilly papers for our Display Board Swap.
This layout is from our Make It From Your Heart guide
(contains both layouts and cards, all for a great value of $7.95).
I found it easier to create a two-page layout and select one page for the swap.
Here's the companion page:
All products are Close To My Heart:
X7163B Chantilly Paper Pack
C1466 Instant Memories stamp set
D1546 Frame Flair stamp set
9035 Make It From Your Heart Guide (Layout 06)
Z1710 Paradise Paper Flowers
Assorted CTMH Buttons in Blush, Buttercup and Goldrush
I love what our groups created for our swaps all using Chantilly papers:
(click on images for more detail)
Friday, February 1, 2013
A new day...brings a NEW Spring/Summer Idea Book!
It's FINALLY here! The new Spring/Summer Idea Book...you're going to LOVE what's inside!
As each new Idea Book is introduced...I host a Catalog Celebration for customers to be the first to see the new product line. We always have lots of fun, as I share new product with them, and play a game of CTMH Bingo with fantastic prizes of course! I gave each person in attendance a special treat using the new Paper Pouches...actually the m&m's were their Bingo markers, then they could eat them!
I used our Spray Pen with Sunset reinker to spritz the Paper Pouch, wrapped the pouch with the new Claire paper, and added the sentiment from the 'For a Friend' stamp set. So cute!
Then I give them a chance to create one 12x12 page using new product and accessories.
Here's what we created at my Catalog Celebration recently using the new Later Sk8r paper (love it!):
Beautiful Artwork...Colorful Papers...and Amazing Accessories!
As each new Idea Book is introduced...I host a Catalog Celebration for customers to be the first to see the new product line. We always have lots of fun, as I share new product with them, and play a game of CTMH Bingo with fantastic prizes of course! I gave each person in attendance a special treat using the new Paper Pouches...actually the m&m's were their Bingo markers, then they could eat them!
I used our Spray Pen with Sunset reinker to spritz the Paper Pouch, wrapped the pouch with the new Claire paper, and added the sentiment from the 'For a Friend' stamp set. So cute!
Then I give them a chance to create one 12x12 page using new product and accessories.
Here's what we created at my Catalog Celebration recently using the new Later Sk8r paper (love it!):
A close-up of the title...using our new Slate Polka Dot Washi tape. The "Hello" sentiment is cut on the Artiste Cricut cartridge, and outlined using our journaling pens. I also love the new Green & Blue Epoxy Bubbles. "Life" comes from the 'A Journey' stamp set.
Another new product, I showcased on this page, is our new Spinners. These are so fun to decorate...and so easy too! The spinner comes apart, so you can stamp directly on the base. The spinner is a 3-1/2" circle...and has a coordinating stamp set, Wheel of Life. You can also see here, the new Outdoor Denim Chevron Ribbon. The Chevron pattern is SO popular these days.
I'm looking forward to the upcoming months...and all the new workshops with the fun color combinations I get to share with you! I hope you join me!
Wednesday, November 21, 2012
Studio J - Shining Bright
Many of you know that my husband, Ken, transports new semi-tractors from the manufacturer to the dealerships across the US and into Canada. During the week of Halloween, he came home with these trucks heading to British Columbia, Canada...and coincidentally the trucks were color coordinated for the Halloween holiday. One of his friends mentioned it looked like he was driving a big ol' pumpkin down the road.
Ken was so excited to show me all the amber lighting on these trucks...normally the trucks just have the bare bones, and aren't much to brag about. These trucks were decked out with exterior lights. Even the full moon was shining bright during our photo op.
Do you have lots of digital photos? You'll love Studio J, CTMH's patented online design software that gets your photos off the memory card and into your life! Have you tried Studio J yet...click here to try for free, you only pay when you put your layouts into your cart and check out.
Monday, September 10, 2012
Photo-less Layout...Live in the Moment
I have to admit, this was a first for me. The project accomplished exactly what it was suppose to...get us thinking outside the box, and outside of our comfort zone! At first, it was VERY intimidating, but then after I got started, it was exciting watching it all come together.
We were given an assignment (challenge) as we left our team overnight retreat last month to document our time spent together as a team, in a 1- or 2- page layout...without using any photos! WHAT??? No photos...that's right, we could NOT use any photos on our pages. We had to bring the experience to life by using journaling and stamping. Not an easy task.
Only a few of us completed the assignment (on time) but I hope those that didn't will take the time to do it and show it another time. It was fun to see how different each layout was...each one was truly a piece of art! However, each layout shared the same theme in the journaling...friendship, food, memories and creativity.
Here's mine:
and with my journaling exposed:
I used the Dakota paper packet, it's quickly becoming one of my favorites! I must have used a dozen different stamp sets to get the "word puzzle" look I was going for. Most of those stamp sets are long retired from CTMH, but nonetheless, still some of my favorites, just for this purpose!
The note (with a pull-out tab) on the right page actually contains the assignment we were given...this is a great technique to save memorabilia of any kind. I created a "pocket" by popping up the word puzzle using 3-D foam tape, and keeping the 4th side open, to slide the paper inside. It reads: "How often do you actually live in the moment or allow yourself to enjoy an experience? My guess is probably not often enough." Then goes on with journaling prompts to help us really reflect on the time we spent together.
As scrapbookers, we are usually always behind the camera, shooting tons of pictures just to get the perfect one, and most often aren't living in the moment, and missing the entire experience altogether. Sometimes, just forget the camera...and live in the moment...experience every aspect of the time you have with others. My hope for you, is to try this challenge for yourself...next time you don't have pictures of an event (for one reason or another), make a layout without any pictures, and let only your journaling tell the story!
We were given an assignment (challenge) as we left our team overnight retreat last month to document our time spent together as a team, in a 1- or 2- page layout...without using any photos! WHAT??? No photos...that's right, we could NOT use any photos on our pages. We had to bring the experience to life by using journaling and stamping. Not an easy task.
Only a few of us completed the assignment (on time) but I hope those that didn't will take the time to do it and show it another time. It was fun to see how different each layout was...each one was truly a piece of art! However, each layout shared the same theme in the journaling...friendship, food, memories and creativity.
Here's mine:
and with my journaling exposed:
(click on images to see in more detail)
The note (with a pull-out tab) on the right page actually contains the assignment we were given...this is a great technique to save memorabilia of any kind. I created a "pocket" by popping up the word puzzle using 3-D foam tape, and keeping the 4th side open, to slide the paper inside. It reads: "How often do you actually live in the moment or allow yourself to enjoy an experience? My guess is probably not often enough." Then goes on with journaling prompts to help us really reflect on the time we spent together.
As scrapbookers, we are usually always behind the camera, shooting tons of pictures just to get the perfect one, and most often aren't living in the moment, and missing the entire experience altogether. Sometimes, just forget the camera...and live in the moment...experience every aspect of the time you have with others. My hope for you, is to try this challenge for yourself...next time you don't have pictures of an event (for one reason or another), make a layout without any pictures, and let only your journaling tell the story!
Friday, August 3, 2012
Stars Shine Bright
The theme of our Convention was "Stars Shine Bright", so this layout's title fits the occasion. One last layout to share, from our Create & Take classes during Convention:
Using the NEW Clementine papers (the opposite side of the same piece from in the previous post). The NEW Cashmere Cardstock as the base pages, the same exclusive Convention stamp set, the NEW Harvest Assortment Bakers Twine, and the NEW Antiqued Gold Mini Medley accent collection...just love all the flourishes, clips, and buttons!
PS. Photos on layouts COMING SOON! LOL
Thursday, August 2, 2012
Boot Stompin' Fun
Here's another layout we created at Convention:
Using the NEW Clementine papers, NEW Champagne cardstock and the NEW Noted Canvas Shapes and NEW Just Blooms Floret Paper Shapes. The stamp set was exclusive to those who attended Convention...I love it! I can't wait to get pictures on these pages...I just haven't gotten that far yet.
Subscribe to:
Posts (Atom)