I've seen so many ideas floating around on social media using the
Perfect Fit - Frames stamp set...it's one of my VERY used stamp sets of late. I love this stamp set...it's just so versatile!
One day, I found this 3x3 card & tote idea on Pinterest (anyone else addicted?), and unfortunately I didn't pin it (what was I thinking???, obviously I studied it enough to re-create it)...and now I can't find the original pin to give credit. I thought this project would be a good one to do a picture tutorial for...here's the finished project:
STEP 1: Take a piece of cardstock, 8" x 7-1/4", on the 8"side, score at 2" and 4". On the 7-1/4" side, score at 2", then flip the cardstock over and score at 2" again. It should look like this:
STEP 2: Next, measure down 2"and mark the left and right edge of the cardstock. Make a diagonal cut from your mark to the score line as shown below:
STEP 3: Cut the middle section to the first score line on both sides as shown:
STEP 4: Adhere piece of patterned paper measuring 1-3/4" by 3"to the lower middle section, centered between the score lines, leaving a border, as shown:
STEP 5: Cut 2 pieces of patterned pieces measuring 1-3/4" x 3-3/4". Next, measure down 1-3/4" and mark the left side of one piece, and the right side of the second piece. Again, make a diagonal cut from your pencil mark to the opposite corner, as shown on each piece. These will be the sides of your box.
STEP 6: Adhere the two side pieces, centered between the score lines, leaving a border as shown:
STEP 7: Next, flip your project over, and add a strong adhesive (I used a sticky strip) to the areas shown:
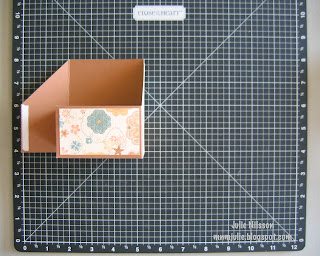
STEP 8: Carefully, bring up the center pieces on each side, and wrap the bottom pieces around to create a portion of the box as shown:
STEP 9: Next, bring the sides of the box to meet the bottom portion of the box, adhering the sticky strip as shown:
STEP 10: The box is almost finished! Make sure all your adhesive is stuck well...I usually take my bone folder and press firmly where I have placed my adhesive.
STEP 11: Next, I measured about 3/8"-1/2" from top of box, and centered from left to right, using an oval punch, I created a "handle" for the box:
STEP 12: Create 3x3 cards to fit inside your box. Any design will work! My cards use the
Clementine papers, and I used the
Perfect Fit - Frames and the personalized
Monogram stamps, each letter of the alphabet is sold separately...just $2.95 per letter. Did I mention that all 4 images on the Perfect Fit - Frames stamp set coordinates with the
Art Philosophy Cricut Cartridge? They do! How's that for fast, simple and easy! Just cut the shape on the Cricut, and stamp!
Shhh...I'm giving these to some good friends this weekend as little goodies at our scrapbook retreat! I sure hope they like them.
I hope I have inspired you to create a project like this...and if you do, please leave a link so I can see what you made. If you have any questions, please post a comment below, and I will do my best to clarify. If you enjoyed this picture tutorial, and would like to see more of these, please leave a comment. I would love any feedback. Thanks!


Julie...this is a great Christmas gift idea for teachers! Your so cleaver...thanks for sharing!
ReplyDeleteThanks, Naomi! Glad you liked it.
DeleteYour instructions are great and easy to follow. I'm going to make some for neighbors' gifts and maybe a few others. Thanks! Chris
ReplyDeleteThanks Chris...what lucky neighbors you have! :o)
DeleteWhat a great gift idea! I love them!
ReplyDeleteThanks, Pamela...Love that you stopped by!
Delete