Saturday, December 15, 2012

Saturday YouTube Video - Whoo's Your Valentine

CTMH is celebrating National PaperCrafting Month with an incredible deal - our 
Whooo's Your Valentine  kit for only $10!  Check out the video...so much fun!

The kit, which retails for $40, can be yours for only $10 when you spend $35 or more in CTMH products from the Autumn/Winter 2012 Idea Book.

The kit includes:

This kit offers you a sneak peek at TWO new Spring/Summer 2013 products: the treat tubes and the silver glitter paper!

This offer is valid NOW through January 31st! Order yours today!

Saturday, December 1, 2012

December Stamp of the Month ARTWORK

December Stamp of the Month, Year-Round Cheer

I hope you're inspired to create cards, gifts and more using this fun year round stamp set...perfect for just about any occasion!

 Click on images for more detail
 Remember...with a order of $50 or more during the month of December, you can add this stamp set to your order for only $5 more.  You qualify for one set at $5 for every $50 you spend...get another for a gift for a friend!

Saturday YouTube Video - The Right Tools Make All the Difference


Discover how easy crafting can be when you use the perfect tool for your project. Whether you are creating 3-D flowers, applying rub-ons, or writing on chalkboard sheets, there is a tool for you!

Enjoy!

For more information on any of these tools, click the links below:
Z1795 - Quilling Tool
Z1796 - Rub-On Tool
Z1767 - Chalk Marker
Z1789 - 12"x12" Chalkboard Sheet
Z1788 - Chalkboard Shapes

From personal experience, the quilling tool and the rub-on tool are worth the investment!  I rarely accented any artwork with 3-D flowers prior to having the quilling tool...it really does make rolling flowers SO much easier!  And I was never a fan of the popsicle sticks for applying rub-ons...sure it works, but the rub-on tool is SO much more ergonomic...no more sore fingers.


Thursday, November 22, 2012

Happy Thanksgiving!

I found this card fitting to share with you today.  The card uses the Flirty papers, and Casual Expressions stamp set, the card design is from Originals, page 91, Puzzle Background.


As we gather together with family and friends on this Thanksgiving holiday, I want to express my gratitude to all of you who, because of CTMH, have become close friends and like family to me.  I cherish the friendships this wonderful company has brought into my life, and without you, I wouldn't be doing the business that I love.  Thank you for your continued support!
Happy Thanksgiving~
Julie

Wednesday, November 21, 2012

Studio J - Shining Bright

Many of you know that my husband, Ken, transports new semi-tractors from the manufacturer to the dealerships across the US and into Canada.  During the week of Halloween, he came home with these trucks heading to British Columbia, Canada...and coincidentally the trucks were color coordinated for the Halloween holiday.  One of his friends mentioned it looked like he was driving a big ol' pumpkin down the road.  

Ken was so excited to show me all the amber lighting on these trucks...normally the trucks just have the bare bones, and aren't much to brag about.  These trucks were decked out with exterior lights.  Even the full moon was shining bright during our photo op.

I don't want Ken to feel like I am leaving his interests out of my scrapbooking pages...so I find that Studio J is perfect for these pictures.  I can get a quality layout finished from start to finish in a matter of minutes, and don't have to worry about whether or not I have the right size photos...the Studio J software does it for you!  I know he's going to enjoy looking back at these pages someday.

Do you have lots of digital photos?  You'll love Studio J, CTMH's patented online design software that gets your photos off the memory card and into your life!  Have you tried Studio J yet...click here to try for free, you only pay when you put your layouts into your cart and check out.

Monday, November 19, 2012

I love FUN MAIL days!

It's not everyday that you open your mailbox and find a hand-stamped card from a friend (Thanks, Shari!).  It's one way to surely brighten someone's day!

The stamp set used is Fall Favorites (S1209), which was September's Stamp of the Month, and currently not available...but I bet it will be featured again soon in a near future catalog.  So if you didn't get it in September, it might just come around again!  The paper, Florentine, is still available and I find it's perfect for autumn cards.  

I know so many of us tend to hoard our papers (myself included), and you may or may not realize that papers really do get dated over time.  In the years I've been with CTMH, we've gone from one sided light-weight monochromatic B&T papers, to today's beautiful double sided cardstock-weight B&T papers in a variety of colors and patterns, with a zip strip border (how can we improve upon that? lol).  Over the last couple of years, my friend Shari has ingrained in my brain "use what you have"...so when you find you have scraps of paper you just can't toss, in this modern day of high-tech, create artwork from your heart to share with a friend!  I bet it will brighten your day too.

Saturday, November 17, 2012

Saturday YouTube Video - Cricut Cards and Envelopes

If you don't already own the new CTMH Artiste Cricut Collection...it's definitely a 'must-have' on your Christmas Wish List!  The new Artiste Collection takes your creativity over the top!

View the Artiste Flyer for more information. 

Watch this video and you'll soon see how you can move beyond flat cards into a whole new dimension with interactive cards using Artiste.  So grab a cup of coffee, sit back and enjoy...

Friday, November 16, 2012

November Stamp of the Month ARTWORK

There is still time to purchase the November Stamp of the Month, Capture the Date, stamp set.  It's only $5 with a $50 order, or you may purchase it at full retail value of $17.95.  Read on to learn how you can get a My Acrylix stamp set for 50% off!


  Each person is assigned a paper pack from the Aututmn/Winter 2012 Idea book to use to showcase the Capture the Date stamp set.  I was assigned the Scholastic paper, and I embellished my card with the Square Durable Studs and the Harvest Bakers Twine.

The possibilities are endless as you can see with our team card swap.


And don't forget...you can also take advantage of this month's special promotion Capture the Date, Capture the Savings - ANY STAMP SET FOR 50% OFF.  Just place an order for $50 or more, include the November SOM set for $5, and you can choose any stamp set (A-E) at half price! PLUS, to show our support of the Red Cross relief efforts affected by Superstorm Sandy, CTMH will donate $1 for every November SOM set sold in November.

Thursday, November 15, 2012

Holiday Open House

It's been two weeks since my last post...my apologies!  Where has the time gone?  I know I'm not the only one who is crazy busy this time of year...and at times somethings gotta give...unfortunately, it was blogging and sharing all of my newest creations.

I promise to make it up to you!  I have been creating for a Holiday Open House that I participated in 2 weeks ago...it was lots of fun and I met some wonderful ladies...to those of you who stopped by to support all the vendors...thank you!  And a BIG thank you goes to MaryBeth for opening up her house to all of us for the day.

I thought you might like to see part of my space...you'll see lots of elements in it.  I showcased different Home Decor items for the holidays, my Studio J online scrapbooking album, home-made Christmas cards (some from years past!), upcoming workshops with sign-up sheets, and lots more.

I bet you want to see some close-up views too, right?  I couldn't just leave you hangin'... here ya go -

Let's start with the Display Tray, I was inspired by this one from Lisa Stenz, I saw on Pinterest. I used scraps of left over Pear & Partridge paper, and some coordinating cardstock (Cashmere and Cocoa) for photo mats.  One of my new favs for the holidays is the Dimensional Elements In Color - Holidays...I'm finding I'm using them alot!  The "ho ho ho" is an image cut from the Artiste Cricut Cartridge.  I can't wait to include pictures and display this year after year.


Next, the My Creations Star.  It's perfect to add that personal touch to your holiday decor, and inexpensive to make one for every holiday!  When you purchase the My Creations Star, I will also supply you with a template to use to cover your star with paper of your choice.  You can cover one side or both as I did on mine.  I used Pear & Partridge paper, Burlap Ribbon, the December 25th stamp set, and a paper medallion from the Artiste Cricut Cartridge.


Lastly, the My Creations Bracket Frame.  There are a couple ways you can cover the bracket frame.  If you have the Artiste Cricut Cartridge, you can select the image that matches the shape of the frame and select the fit to page button on your machine (which will cut it at 11", but you have to use fit to page button), you'll still need to cut out the center of the frame using a cutting knife and Versamat.  Or you can just trace the frame onto your paper, and cut out by hand.  I also found it helpful to finish the edges of my paper (once it was adhered to the frame) with the finishing files, then sponged the edges in Cocoa ink.  I embellished my frame with more of the Dimensional Elements In Color - Holiday chipboard pieces, and added a little bling with the Sparkle Flourishes.

I have another section of my booth, that I will be sharing with you in the weeks ahead.  I have items that appear in the photo that I plan to use as a gift for our team Christmas gift exchange, so I don't want to spoil the surprise, just in case someone from my team stops by for a visit.  I will post after our Team Christmas Party on December 1st.

Wednesday, October 31, 2012

Happy Halloween!

Happy Halloween!!!
...to all the ghouls and goblins in blogger land!

I don't do much of the "scary" halloween, I'm more of a "cutesy" halloween creator.  
These cards below show more of my style: 

Yes...I'm still using the Perfect Fit - Frames stamp set (I just can't get enough of it...definitely getting my money's worth!)  The B&T paper (patterned) comes from the Spellbound kit.  The Slate cardstock on the front of the card, was scored, then sanded, highlighting the white core of our papers (I love that about our papers!).  I also wrapped the Black Tulle Ribbon around the B&T paper on the front of the cards, tied into a knot.  The scallop circle and the matted circle were POPPED using 3-D foam tape to give some additional dimension to the cards:
 The other stamp set I used was Perfect Fit- Halloween for the sentiments, and pumpkin.
 

Have a fun and safe Halloween night!  

Monday, October 29, 2012

BOO Banner

Halloween is just about here...so I thought I would show off my "BOO" banner that I have hanging above my fireplace in my studio, before I pack it away until next year. 

I absolutely fell in love with the Spellbound Cricut kit.  The WOTG kit creates a Halloween party for 8 including treat bags, cupcake picks and liners, soda wraps and this banner.  


If you're one to throw a Halloween party, you just might want to consider this kit for next year, 
but purchase it now...as it won't be carried over to the next catalog. 
You'll be sure to impress your guests!!

The papers are so much fun, and only available in this kit...perfect for Halloween!  
I'll show you some more artwork Wednesday.

Sunday, October 28, 2012

Studio J = Tricks and Treats

Time is running out, if you haven't taken advantage of the Studio J special in October!  

Check out the "Monthly Specials" tab in the menu bar above to get all the details on how you can get a free Studio J layout with your Studio J purchase.

Watch this "Love Your Layout" video, and learn some new tricks in Studio J as you treat yourself to the ultimate online creative experience.  
You'll learn how to apply photo filters, create ruffled ribbons and more!


Now, log onto Studio J, and create your own layout! 
Warning: Studio J is highly addictive, SO much fun, and without all the mess or supplies needed to create beautiful layouts.  It's all online!  Try it...I think you'll love it as much as I do!

And don't miss out on your opportunity to save $$$ in October (special ends October 31, 2012) with your Studio J purchase!


Saturday, October 27, 2012

YouTube Saturday Video - Cardmaking WOTG kits

Card Makers REJOICE!  Workshop-on-the-Go kits made just for you!

Grab your Saturday morning beverage of choice, and enjoy this video, as Kristine showcases these TWO fabulous card kits, Avonlea and Pear & Partridge.


FYI - I will be hosting the Avonlea Cardmaking workshop in January 2013...watch for dates!

Friday, October 26, 2012

Christmas Cards - Pear & Partridge Cardmaking WOTG

The weather has suddenly turned cold and it's snowing in Colorado...so it's a perfect time to start thinking about those hand-made holiday cards.  Do you send out hand-made cards for the holidays?  
If so, I've got you covered...Close To My Heart has a workshop kit 
designed especially for Christmas cards!  

I hosted this workshop several times in October...but if you missed it, you can create 15 cards (5 each of 3 designs) on your own...just order the Pear & Partridge WOTG for Cardmaking kit.  Each workshop kit comes with an exclusive stamp set, ribbon, red sparkly glitter gems, cardstock and patterned papers, card bases with envelopes, and an instructional brochure, complete with cutting diagram and step-by-step directions to putting your cards together.  

(click on image to enlarge)

If you send out more than 15 Christmas cards, don't worry...contact me, and I can hook you up with additional supplies to complete more cards, without purchasing another entire kit.  
Many of my guests who attended this workshop did just that!
HURRY...this card-making workshop kit will retire after this holiday season 
and will not carry over to the next catalog.  

Saturday, October 13, 2012

YouTube Saturday! - Dauber Dynamite

In this video,  Kristine and Monica will show you how to get perfect precision from your inks featuring a stamping technique using sponge daubers for a soft, shaded look.
Catch the RAINBOW with sponge daubers!

Enjoy!


Thursday, October 11, 2012

Monogram & Perfect Fit = Tutorial

I've seen so many ideas floating around on social media using the Perfect Fit - Frames stamp set...it's one of my VERY used stamp sets of late.  I love this stamp set...it's just so versatile!

One day, I found this 3x3 card & tote idea on Pinterest (anyone else addicted?), and unfortunately I didn't pin it (what was I thinking???, obviously I studied it enough to re-create it)...and now I can't find the original pin to give credit.  I thought this project would be a good one to do a picture tutorial for...here's the finished project:


 STEP 1: Take a piece of cardstock, 8" x 7-1/4", on the 8"side, score at 2" and 4".  On the 7-1/4" side, score at 2", then flip the cardstock over and score at 2" again.  It should look like this:


STEP 2: Next, measure down 2"and mark the left and right edge of the cardstock.  Make a diagonal cut from your mark to the score line as shown below:


 STEP 3: Cut the middle section to the first score line on both sides as shown:


STEP 4: Adhere piece of patterned paper measuring 1-3/4" by 3"to the lower middle section, centered between the score lines, leaving a border, as shown:


STEP 5:  Cut 2 pieces of patterned pieces measuring 1-3/4" x 3-3/4".  Next, measure down 1-3/4" and mark the left side of one piece, and the right side of the second piece.  Again, make a diagonal cut from your pencil mark to the opposite corner, as shown on each piece.  These will be the sides of your box.


STEP 6: Adhere the two side pieces, centered between the score lines, leaving a border as shown:


STEP 7:  Next, flip your project over, and add a strong adhesive (I used a sticky strip) to the areas shown:


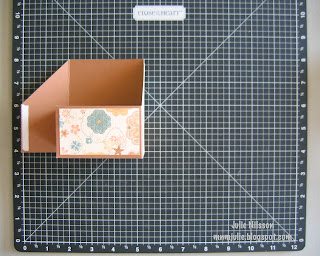
STEP 8:  Carefully, bring up the center pieces on each side, and wrap the bottom pieces around to create a portion of the box as shown:


STEP 9:  Next, bring the sides of the box to meet the bottom portion of the box, adhering the sticky strip as shown:


 STEP 10:  The box is almost finished!  Make sure all your adhesive is stuck well...I usually take my bone folder and press firmly where I have placed my adhesive.


 STEP 11:  Next, I measured about 3/8"-1/2" from top of box, and centered from left to right, using an oval punch, I created a "handle" for the box:


STEP 12:  Create 3x3 cards to fit inside your box.  Any design will work!  My cards use the Clementine papers, and I used the Perfect Fit - Frames and the personalized Monogram stamps, each letter of the alphabet is sold separately...just $2.95 per letter.  Did I mention that all 4 images on the Perfect Fit - Frames stamp set coordinates with the Art Philosophy Cricut Cartridge?  They do!  How's that for fast, simple and easy!  Just cut the shape on the Cricut, and stamp!

Shhh...I'm giving these to some good friends this weekend as little goodies at our scrapbook retreat!  I sure hope they like them.

I hope I have inspired you to create a project like this...and if you do, please leave a link so I can see what you made.  If you have any questions, please post a comment below, and I will do my best to clarify.  If you enjoyed this picture tutorial, and would like to see more of these, please leave a comment.  I would love any feedback.  Thanks!


Wednesday, October 10, 2012

October Workshop - "Moonlight"

With Halloween right around the corner, I planned to help my gals get a head start on the photos they'll be taking of their little trick-or-treaters.  Earlier this month, I hosted the Moonlight Workshop-on-the-Go kit.  We made these two 2-page layouts:

(click on images to enlarge to show greater detail)
Each Workshop-on-the-Go kit comes with a full color instructional brochure, so it's easy to create the workshop on your own.

I love the colors in the Moonlight paper pack...fall colors have always been my favorite.  But I wanted to share with you to "think outside the box".  These papers are more than just for fall or Halloween.  One of my team members (Hi Bertha!) created a beautiful CHRISTMAS card using these papers...that's right, Christmas!
Bertha's card uses the October Stamp of the Month, Very Merry Christmas.  She dyed the Color-Ready Seam Binding Ribbon with Smokey Plum ink, and added a Rhinestone Designer Brad and the Silver Shimmer Trim for additional bling.  The pattern on the Slate cardstock was created using an image from a Halloween stamp set, All Hallows Eve.  Bertha used the Metallic Markers (silver) in the center of each of the stamped images.  Great job on this card Bertha!  I've had so many compliments, giving you full credit, of course!


Saturday, October 6, 2012

YouTube Saturday - Terrific Two-Tone

Today's video has Monica showing how you can use ANY stamp set to get a two-tone effect when you stamp.  Many of our stamp sets are designed to be "base" and "shade" stamping...but listen carefully as they share the "secret" to how any stamp set can be used for two-tone stamping!   Comment below when you hear it...but don't give the secret away!  "Terrific Two-Tone" features base and shade stamping for a terrific two-tone look.

ENJOY!


Thursday, October 4, 2012

October Stamp of the Month ARTWORK

OCTOBER Stamp of the Month = Very Merry Christmas  


There are 11 images in the Very Merry Christmas stamp set and perfect for your holiday cards...and did I mention 5 images coordinate with the CTMH Artiste Cricut cartridge...no hand cutting!

I was assigned the Dakota paper pack, and created this Country Christmas card.  My card uses the Bakers Twine - Natural Assortment, Round Durable Studs (love these!), and a rhinestone from the Haunted Assortment (how's that for thinking outside the box LOL).  I used 3-D foam tape to "pop" each element on the ornament to give dimension to my card.  Of course, everything is sponged (ink distressed) in Slate ink.


Here is a sampling of what our group created using this stamp set...and to show the versatility of our papers, each person was assigned one of the different paper packs in the Autumn/Winter Idea Book.  Hope these will inspire you to get an early jump on your holiday cards!

 (click on photos to enlarge them for more detail)
Get the stamp of the month for only $5 when you place a $50 order during the month of October.  If you're ready to start your holiday cards...contact me today!

Saturday, September 29, 2012

Saturday YouTube Video - Spellbound Halloween Party

If you host Halloween parties - I have the perfect kit for all of your party favors, including treat bags, cupcake liners, soda wraps and a BOO banner...it's the Spellbound Workshop on the Go kit.  This Cricut kit gives you most everything you need to create a ghoulish Halloween party for 8 guests...even including exclusive papers and a coordinating stamp set too!  The cute Spellbound paper packet is available only in this kit.

Sorry...I'm not hosting this particular kit in my workshop schedule, but with the instructional brochure included in the kit, I have no doubt you can assemble this kit on your own.  You'll need to set aside about 6 hours and you'll need the new CTMH Artiste Cricut cartridge to complete this kit.

Watch as Kristine shares with you the Spellbound Halloween workshop:
(This kit can be found on page 14 of the Autumn/Winter Idea Book.)

Contact me, or shop my website to get your Spellbound Halloween kit today!  


Saturday, September 22, 2012

Saturday YouTube Video - Spanning the Space

Grab a cup of your favorite Saturday morning beverage, sit back and enjoy a quick stamping video...then take some time to create this weekend!
Enjoy!

Wednesday, September 19, 2012

Flirty...with a twist!

I recently hosted my Flirty WOTG workshops, and I admit...the pages are BRIGHT!  I personally don't mind the pinks and yellows...these colors will definitely give a splash of color to the pictures I eventually put on them.

However, my friend Barb, didn't think her boys would appreciate SO MUCH pink...so she adapted her pages to work for her family:
That's what I love about CTMH B&T duos...the versatility!  Instead of using the Flirty Raspberry cardstock color as the base for her layout, she used New England Ivy cardstock, and used the opposite side of the B&T duo's that the rest of us were working with.  So remember...just flip papers and change it up to work best for YOU!